Times Two B200R

#22
One set of SunF 21x7-8's installed. Fits no issues. One more set to go.

Sorry no progress on cvt yet. Sidetracked by the tire delivery.
Those are front tires, designed for steering, not for driving, not a great choice for the rear. Larger OD tires will change the effective gear ratio (search it), reducing torque at the rear wheel, and make brakes less effective due to change in mechanical advantage (larger OD tire will have more leverage over the brake).
 
#23
Was at a Tractor Supply yesterday looking at these and thought they looked heavy. But 160? With empty tanks my 200U's weigh around 115-120.
154 lb for the B200R, 121 lb for the CT200U, 33 lb difference. I imagine a good bit of that difference is in the frame. The B200R's 34mm tubing is much larger than the CT200U's puny 22mm tubing, and there's more of it. The B200R is 6" longer than the CT200U. The suspension fork would add more weight. The disc brake may weigh more than the CT200U's drum brake. Add a headlight and a larger seat. It all adds up.
 
#25
Well, thanks for the input guys. The bike at tractor supply differs greatly from the one offered at Dunham's sporting goods.

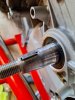
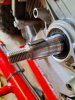
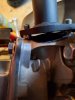
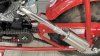
The tractor supply bike has no jackshaft. Sprocket is on the output side of engine and bike. No front brake. Centrifugal clutch with 2:1 gearing setup with spring tensioner.

Dunham's has the welded in jackshaft mounted with a flimsy looking cvt belt setup. Flipped rear wheel. Front brake. Engine mounting plate is higher in the frame and the rear frame tubing is bent different in the rear. (In my opinion it is an uglier bike without the proper lines. My eyes jump around while viewing it.)

I compared and visited these bikes in person.

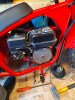
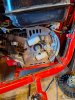
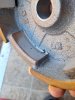
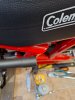
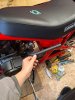
Not sure about the triple tree setup on mine or the looking bent thing. I will look hard at it today. That part of the bike was pre-assembled so I haven't paid it very much attention other than snugging up fasteners.

I will count sprocket teeth today also to verify.

I have put about 20 mins seat time on it since the tire change. (I travel for work.) BUT, I can tell you the tire change was worth it. It rides much better. Noticeably softer, Noticeably more stable during cornering, especially during heavy throttle and the transition from brake set to throttle acceleration while cornering.

HOWEVER, I also noticed a fair drop in torque. I expected it, and it does exist. I am 190 lbs

This torque loss is entirely offset in my opinion by the ride quality and overall grin experience. No regrets On that.

Before the tires....The bike felt mushy and unresponsive. It would severely understeer until the point that it would oversteer at and extremely fast rate. Leaving me questioning and second guessing the tracking while riding straight. It wandered/meandered. Either that makes sense or not. Imagine riding on a large pile of pine needles, basically.

Another symptom of weight and possibly sidewall thicknessness. Fork flex could have been contributing too, but all these symptoms are tolerable now...After the tire change, I am happy with the little hardtail.

Front tires v.s. rear tires. In my opinion... only front tires should be used as rear tires do not have the crown that is needed to increase the contact patch while leaning. And they keep the correct side of the axle loaded while turning. Do not put a rear tire on the front.
Rear tires are flat profile and leave you riding on a thin edge while leaning. This also leads to loading the axle improperly in regards to the left hand and right hand sides. No suspension to counteract this just magnifys it.

I have some free time and getting started back on this project.

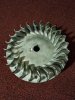
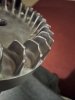
First, I will install an aluminum flywheel to offset my loss of torque in the taller tires. And verify fitment before moving to carb and header and getting that engine lifting plate on. 20240128_083102.jpg 20240128_083117.jpg
 
#28
On a side note, this bike does have the e.p.a. carburetor. No adjustment.

I have a new replacement carburetor In hand. Airfilter and adapter kit/package. Header and bullet muffler. A few jets and four types of emulsion tubes. But I will get into all that later. First the lazy Sunday...simple things first.
I will retain the governor function and everything for now. As I am not going inside the engine, yet.

Just clearing head space for the end result of CVT Torque Converter Madness!

I do not expect much, though.
I have a genuine gx390 in a box too. But we are not doing that yet either. First things, first. Flywheel to offset the tire size loss and then carb, header, etc... while of course test riding between...
 

SAS289

Well-Known Member
#29
Would be surprised if you notice a difference with just a flywheel, especially if it's timed the same as the stock flywheel. My mild built 196 started with a PVL, then went back to a stock flywheel, and now has a cast aluminum all timed the same and there weren't any noticeable differences between them. There should be differences, but I didn't notice them.
 
#30
It's all good, all part of the whole package.

This is a cheap one. Stock type. Claimed 28 degrees straight up. Will run keyless when we get to tuning. 17064645927647837008694172641940.jpg

I have heard of them being easily damaged. I relax arm walking dropped mine on concrete earlier. Surprisingly unscathed.
17064647631092475611187821362626.jpg

Two small dings! Added loads of character to this unidentifiable part. Made on 06/23 casted in it.
 
#31
Got the flywheel lapped in. It had a casting flash or taper depth problem about 1/8th inch thick that was not casted with a taper. Other photos of new ones show this edge on the outside of the inner diameter. Appears the boring or casting depth of the cone taper was short. Quick fix with a dremel and that is the un-lapped portion on the outer edge. Had to play with lights to show it in the picture. 20240128_145424.jpg
 
#32
20240128_151120.jpg
A key shipped with the flywheel. Lower one. Stock is the top one.
20240128_151541.jpg
"The other" key left a little to be desired.
20240128_151501.jpg
Unable to assemble with the "other" key. Slid together like butter with the stock one.
 
#33
20240128_151001.jpg
Cleaned up, with a light coat of spray silicone. No charging coils, I will go rechargeable light, eventually.

Back together, ran fine. The difference in the butt dyno was.... nothing. But it is all in preparations.

This engine is the 168G. Runs fine, stock coil, stock key, stock pullstart cup, etc. Definitely room for timing though.
20240128_155123.jpg 20240128_155058.jpg

Header test: Fail
First look at the difference.
 
#34
20240128_160041.jpg 20240128_160120.jpg

But it all interferes with the frame. Check it out. 20240128_155633.jpg 20240128_155744.jpg 20240128_155818.jpg 20240128_155616.jpg

Wayyyy off! So pause for today. I do not see a point in continuing with the carb change until I get a header fitted.

Any suggestions on pipes are welcome. I will most likely cut and weld this one. But remember I have a second bike to do in the future also. This one is the test dummy.
 

SAS289

Well-Known Member
#36
I had the same issue with the short header I got. I just heated it red hot at the bend and tweaked it over a touch. It's a leg burner if I stop and put my left foot down. I slide forward on the seat and I'm fine.

If you have the proper grinding tools you can open and clean up the inlet.
 
#37
View attachment 310771
Cleaned up, with a light coat of spray silicone. No charging coils, I will go rechargeable light, eventually.

Back together, ran fine. The difference in the butt dyno was.... nothing. But it is all in preparations.

This engine is the 168G. Runs fine, stock coil, stock key, stock pullstart cup, etc. Definitely room for timing though.
View attachment 310772 View attachment 310773

Header test: Fail
First look at the difference.

I put the cast aluminum flywheel on my grandsons stock 196, with the stock key, set coil air gap to .045", it still only had 23 mph top speed, and same max rpm, but it got there about 10-15 ft sooner.

I was using my neighbors mail box and the edge of my drive way for testing distance. I'd say that is an improvement.
 
#38
One thing I like about a header I bought from NR Racing is that the tubing is D-shaped where it's welded to the flange, which has a D-shaped opening, to match the exhaust port. It smoothly transitions to round within the first inch. NR must have a die to shape the end of the tube. Another thing I like about it is, it being a 3-stage through-the-frame (center exit) header, is that by cutting the header off in the 2nd stage section, a 28mm inlet aluminum shell / stainless steel core pit bike muffler was a perfect snug fit.
https://www.nrracing.com/Mini-Bike-Exhaust-s/2028.htm
 
#39
Great tip Charles! Sounds like it worked out great.

There are also "weld it yourself" kits for around $33 on EBae. I noticed they ship with two versions of flanges. Round and D shaped. I wish I would have went that route, but we are learning....

I do not own any exhaust working stuff. I have always gotten by with a work-a-round of some type. Or hired it out.

Now... how to get that brown stripe out of the back of my jacket? HONEYYYY....
 
#40
On the CT's do you guys have to lengthen or shorten chains when adding CVT torque converters?

My engine will travel up and forward. And most likely to the right also. If I can make up for chain alignment.
 
Top