WLB's Just For Fun 2018 Tote Gote

WLB

Active Member
#21
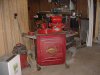
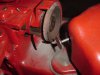
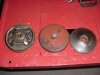
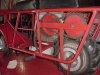
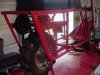
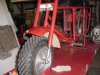
I don't know if you can tell from the pictures but I thoroughly cleaned the whole bike, took the wheels off and cleaned and regreased the bearings, took the chains off and soaked and rerelubed them. The paint is in good shape so I'll wait for warmer weather and just touch up some spots. The Climbaway clutch will get beadblasted and painted.

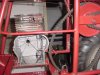
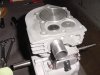
I plan to use a Mikuni slide carburetor so I brought home another 5hp block and will use it to mock up the intake manifold and exhaust.
MVC-079F.JPG MVC-080F.JPG MVC-081F.JPG MVC-082F.JPG
 
Last edited:

WLB

Active Member
#23
Richard, The Tote Gote seems to be very tough in spite of me dumping it once (never drag heavy tree limbs with the rope tied to the top of the frame and make a sharp turn) and my wife dumping it several times.

We are back to single digit temps so I stayed indoors and worked on getting the cam, lifters, and valves adjusted. I plan to use the stock cam but had to get new lifters so I carefully stoned the cam lobes with a fine grit toolmakers stone to remove any wear pattern made by the original lifters and then slicked them up with a hard Arkansas stone. I think you can see the difference between the one lobe that is done and the one left to do.

I put the cam and lifters in the case and dropped the valves in. It looks like there will be more to be removed from the valve ends to set the clearance than I can do by hand so that will have to wait for a trip to the shop and the valve grinder. MVC-076F.JPG
 

WLB

Active Member
#25
Thanks Richard. The marks looked deeper in the photo than they actually were. I like to treat used valve parts like a used bore that is getting new rings and remove any glaze.

My son had some work to do in the shop today so I went with him and worked on setting the valve clearance. The old Kwik Way valve grinder is the first machine my son restored. We bought it at an auction when he was about 10 and he took it apart shortly after. It sat on the work bench until he was in college and he finally finished painting it and putting it all back together.

I first ground fresh seats on the valves and then ground the ends until I had .007 clearance on the exhaust and .005 on the intake. I plan to run the engine for about an hour or so and then recheck clearances. It will probably take me that long to get the jetting dialed in on the carb.

MVC-091F.JPG MVC-090F.JPG MVC-092F.JPG MVC-093F.JPG
 
Last edited:

WLB

Active Member
#29
Thanks guys. The old valve grinder is a neat, versatile, tool. I've done several non valve jobs that required a ground finish on it also.

Haven't accomplished much lately. Took down another big tree in the back yard and really over did it moving the log sections and pinched a nerve in my back. I keep thinking I'm still 60:laugh::laugh: Also haven't found the rod bearings for the ARC rod. I know I have them somewhere at the shop because I saw them last fall. Most of the shop has been moved around in the last year as we added machines, put in new LED lighting, and added shelving. I know--excuses, excuses:laugh::laugh:

I did set the extra block in the frame. It looks like it should be easy enough to run the intake straight back and the exhaust up over the sheet metal fender with minimal bends. MVC-098F.JPG
 

WLB

Active Member
#30
I finally got a little more work done. Found the rod bearings and put the shortblock together. My son turned an exhaust port reducer for me since he had the pipe thread program already in the lathe but I probably could have made it from a piece of black iron pipe. I won't bolt the head on until I get the tins bead blasted and primed.
MVC-105F.JPG
 
Top