I looked around on the forums and couldn't seem to find a tutorial for this. I recently picked up a dial indicator and wanted to double-check my method before I wrenched the flywheel back down and there doesn't appear to be a thread for it. I doubled checked with a seasoned Tecumseh mechanic and wanted to provide a a thread here for others to reference as needed.
The process is really simple, but has to be really precise.
First off, while it's not entirely necessary, a dial indicator will make the process much easier. If you don't want to drop $50-100 on an indicator, then you'll need to remove the head and measure the piston directly. I'm going to demonstrate using the dial indicator.

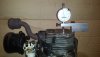
When inserting the dial indicator, make sure the foot goes towards the piston and stays that way. Screw the collar into the spark plug hole.

Lift the dial indicator (it slides on the collar) about 1/4-1/2" from it's bottom position. While holding it in that position, tighten the collar set screw down. Next, rotate the engine to top dead center. You're going to see the dial go nuts when you get it here. It will go all the way up and start coming back down. Find the highest point and that's top-dead-center. Turn the face on your dial to mark that point as zero, and lock down the face using the set screw.

You're now ready to set the backwards rotation to the specified position. For this engine (HS40), the recommended position is .035" before TDC. I just rolled it backwards a tiny bit until it read .035"

Now that you have located the .035 measurement, you can remove the flywheel and start setting your points. My stator was completely removed from the engine during the cleaning process, so I needed to set the points first. To do this, you have to rotate the stator and find the sweet spot where the points are open as far as they'll open. Once you get them there, tighten the stator down so it won't move. Now, set your points to .020". There is a small silver screw inside the points housing.

Loosen the points screw and use a flathead screwdriver to turn them open and closed until the air gap is .020". Once you have them in the correct position, tighten the points back down.

Finally, now that your points are set correctly, loosen up your stator bolts and rotate it to the left until the points are barely open. I was told that a lot of guys use an ohm meter for this, but if you've got good eyes and good lighting, you can see the gap. Once you get it positioned just right, you're ready to tighten it down and put the flywheel back on.
TIP: Before you put your flywheel back on, I suggest you check the magnets for debris. I won't mention any names, but someone had a horrible experience trying to get their engine to run because the flywheel key was stuck to the magnet :laugh:
Hopefully, this will be useful for a lot of the guys that were in my position and won't have to ask a million questions. Feel free to add to it or make corrections as needed. Thanks to OND for his patience with me while I figured this out. He's truly a patient and helpful person!
The process is really simple, but has to be really precise.
First off, while it's not entirely necessary, a dial indicator will make the process much easier. If you don't want to drop $50-100 on an indicator, then you'll need to remove the head and measure the piston directly. I'm going to demonstrate using the dial indicator.
When inserting the dial indicator, make sure the foot goes towards the piston and stays that way. Screw the collar into the spark plug hole.
Lift the dial indicator (it slides on the collar) about 1/4-1/2" from it's bottom position. While holding it in that position, tighten the collar set screw down. Next, rotate the engine to top dead center. You're going to see the dial go nuts when you get it here. It will go all the way up and start coming back down. Find the highest point and that's top-dead-center. Turn the face on your dial to mark that point as zero, and lock down the face using the set screw.
You're now ready to set the backwards rotation to the specified position. For this engine (HS40), the recommended position is .035" before TDC. I just rolled it backwards a tiny bit until it read .035"
Now that you have located the .035 measurement, you can remove the flywheel and start setting your points. My stator was completely removed from the engine during the cleaning process, so I needed to set the points first. To do this, you have to rotate the stator and find the sweet spot where the points are open as far as they'll open. Once you get them there, tighten the stator down so it won't move. Now, set your points to .020". There is a small silver screw inside the points housing.
Loosen the points screw and use a flathead screwdriver to turn them open and closed until the air gap is .020". Once you have them in the correct position, tighten the points back down.
Finally, now that your points are set correctly, loosen up your stator bolts and rotate it to the left until the points are barely open. I was told that a lot of guys use an ohm meter for this, but if you've got good eyes and good lighting, you can see the gap. Once you get it positioned just right, you're ready to tighten it down and put the flywheel back on.
TIP: Before you put your flywheel back on, I suggest you check the magnets for debris. I won't mention any names, but someone had a horrible experience trying to get their engine to run because the flywheel key was stuck to the magnet :laugh:
Hopefully, this will be useful for a lot of the guys that were in my position and won't have to ask a million questions. Feel free to add to it or make corrections as needed. Thanks to OND for his patience with me while I figured this out. He's truly a patient and helpful person!