Boonie Build

#1
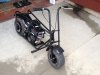
I picked up an old Boonie about a month and a half ago. At first I just wanted to get it running, but after seeing some of the gems you guys here have put together I decided to rebuild the whole thing. I bought the bike for $100, and have since purchased a Predator 6.5 and a new jackshaft kit from OldMiniBikes warehouse. This is my first build, so take it easy if you see me doing something stupid.

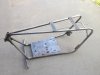
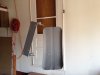
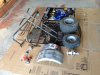
Here is a pic of the bike as I bought it.
original boonie.JPG

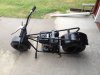
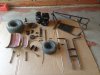
Over the last couple days I have taken everything apart, and I am prepping for a new paint job.
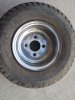
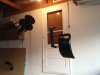
Here is a pic of the bike in pieces.
boonie parts.JPG

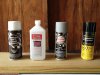
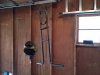
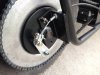
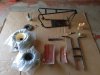
Here is a pic of the parts I need to prep for paint. I used Citristrip gel on all of it. I used a paint brush to apply the gel and then let it sit for about 2 hours. I didn't want to remove the tires if I didn't have to, so I cut some plastic to keep the paint remover from getting on the tires. I'll put the plastic back on before I paint.
boonie pr.JPG

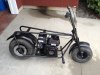
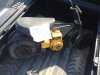
Here is a pic of how the Citristrip worked.
boonie pr2.JPG

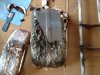
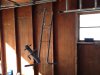
The paint didn't come off that easily on everything, so I used a drill and wire brush attachment to get the rest. I'm about half done with that. Here is a pic of where I am at.
boonie pr3.JPG

After I get the paint off, I'm going to prime, paint and then clear coat. I was thinking of bringing it in to get sandblasted and painted, but I want to do this all myself. I need to order a kickstand, new brake, brake lever and new bearings for the front and rear wheels and then I should be set.
 
Last edited:
#4
Thanks for dropping in Jack's, I will also be watching yours.

Buckeye, the paint was a mess. There were places that had been painted at least 4 different colors :laugh: . I'm making some good progress, but I still have a bit of work to do to get it paint ready. I will post a few pics later today of the rims and frame and how they are coming along.
 
#5
I've got a bit of work left on the frame, but I picked up a dremel tool today so that I can get into all the corners and what not that I couldn't get to with the wire brush and sander.

Here is how the frame is coming along.
boonie frame.JPG

And here is the back wheel. I think this one is ready.
boonie wheel.JPG

I really wanted to do the paint removal myself, but if I decide to do another bike, I might consider bringing it in to get sandblasted. I'm not finished yet, and I probably have a good 5-6 hours in just paint removal itself and probably another 2 hours to get it where I want it before priming, painting and clear coating it. I have plans to paint it this weekend so I'll post some more pics when I get that done.
 
#7
nds1968, thanks for stopping in!!


So I am finally done with all the paint removal. I did a bit of research, and got some advice from the local body shop guy, and purchased some stuff to get going on the paint job.
cans.JPG

The first thing I did after all the paint was removed was to power wash the frame and parts that need painting. Next, I started with the wax and grease remover, let it dry for 30 minutes, then washed it in rubbing alcohol and let it sit another half hour. After that, I took an air compressor to it to make sure all the dust and what not was cleaned off. Then I strung up several strands of 80lb test spider wire with some fishing hooks to hang the parts from :laugh:. I primed once, waited 5 mins, and primed a second coat. Here are a couple pics of the primed parts.
primed 1.JPG primed 2.JPG

After the primer sat for 40 mins, I applied a coat of paint, waited 15 mins and applied a second coat. Here are a couple pics of the painted parts.
painted 1.JPG painted 2.JPG
 
#9
It seems to have turned out okay so far, and once I get the kickstand welded on tomorrow, I will be able to get the frame done. I also need to do the wheels. I'm getting pretty excited to put her back together, and thanks to some help from Chad from OldMiniBikes Warehouse, I was able to get a few new parts that I needed ordered up. I can't add any more pics for some reason, or I'd add one of the parts (new brake assembly, brake lever, clutch, bushings, bearings for the front and back wheels, and the kickstand. I'll update once I get the frame and wheels painted, and then I'm sure I'll wait a few days to put it back together.
 
#11
So I basically have the entire bike put back together. I didn't beat up the paint job too bad putting her back together, but I had everything laid out on a blanket and really took my time. I still need to make or buy a seat, and armor all the tires. Here are a few pics, and I'll post some more once I get the seat on, and get those tires shining.

boonie final 1.jpg boonie final 2.jpg boonie final 3.jpg

I had to replace the original with this Azusa 5" brake assembly. I can't wait to see how well this thing works, it seems to grab pretty tight.
boonie final brake.jpg
 
#14
So I basically have the entire bike put back together. I didn't beat up the paint job too bad putting her back together, but I had everything laid out on a blanket and really took my time. I still need to make or buy a seat, and armor all the tires. Here are a few pics, and I'll post some more once I get the seat on, and get those tires shining.

I had to replace the original with this Azusa 5" brake assembly. I can't wait to see how well this thing works, it seems to grab pretty tight.
Looks sinister all blacked out, bet you can't wait to go for a ride :thumbsup:

Karen makes the best some seats!! I just got my Boonie seat she did an excellent job with the original logo
You know we like pics around here :wink:
 
#19
I finally got to take her out for a spin last night. I didn't go too far, but I was able to test the brake out. I have heard how the drum brakes on these things are not very good so I had my expectations set pretty low for it. It wasn't too bad actually, I won't be stopping on a dime, but it gets the job done and I feel much safer than using my feet to stop:laugh:. I have to admit I'm pretty pumped to have something to ride around on.

I did get a seat cut out, but it's just the plywood for now, and I need to put some padding and a cover on it. Either that or just buy one from Karen.
 
Top