I posted this to the wrong thread. I am sorry everyone. I just realized my mistake!!!
I received the throttle linkage from Joe and it was earmarked for an H50 I have for a roper. the throttle on the Roper was pieces and parts to make it work. Certainly nothing that was correct for the engine. So...
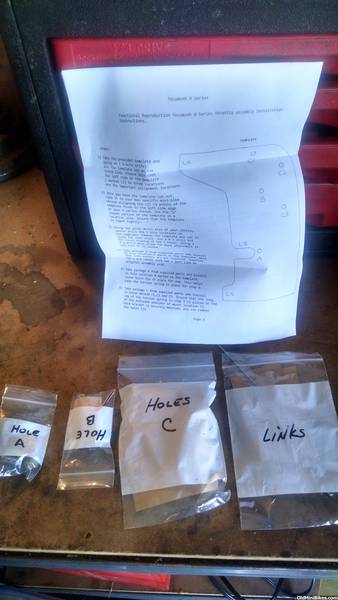
Joe's packaging is perfect for advanced mechanics and beginners. Anyone can truly do this conversion. In the package you will find 4 bags.


there are three bags...
Bag A

Bag B

and Bag C

which are the parts that will be on the shroud. There is also a linkage bag included for 2 linkages. one is for the shroud linkage to the governor and one is from the governor to the carb butterfly. All packaged separately in zip lock bags. What I found great about this is you only had to have the parts you were working on in front of you and on the bench. Absolutely NO losing parts this way. Joe also has them put together with bushings, washers and bolts/nuts as they should be on the shroud. Take a minute and look at them. Take a picture with your phone, lay them out in order. You can't make a mistake.
Also included in the box are a set of instructions and a template for drilling holes. My STRONG recommendation on the template is to xerox a couple of copies so when you get grease, tear it or give it to the dog in lieu of homework you will still have a template. You are probably going to want to cut them up to do this to tape the template to the shroud.
Unfortunately I have corrupt photos so I will work around the missing pics.
I cut the template out and drilled the holes. The template is such that you will lay it on the shroud and tape it with great ease. You really can't mess this part up. The template is pretty accurate as to how to line it up.
Here is the shroud drilled and the assembly of the shroud parts. This is a little frustrating as I had photos of the three parts assembled one at a time and the photos are not working. You can see that I only drilled the two holes for the C bracket. That was deliberate as I broke my drill losing a grip on the shroud and dropping it. It really isn't necessary.


I have the C bracket slightly off as I ripped the template off by accident dropping it on the floor after my drill motor crapped out.
Since the bracket is used only for the throttle cable and to hold the return spring, it made absolutely no difference.
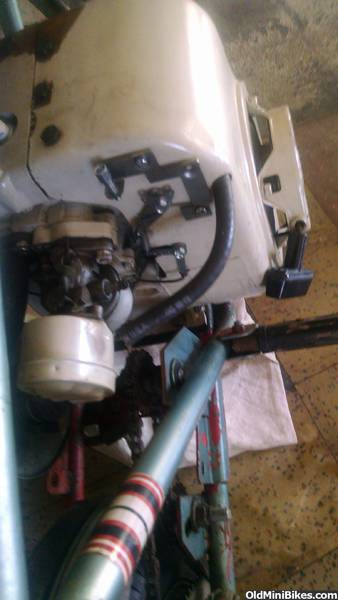
Here is the shroud back on the bike...


Joe had sent the wrong linkage for the governor linkage so I used a spare wire linkage I have. Your kits will all include the proper linkages. Joe PMed me just after he sent it realizing the switch. His linkage is exactly as the original though.
Here is a video of the engine just after I tightened every thing up.
https://www.youtube.com/watch?v=pG1HiBFANHI
Gentlemen, I find this throttle just about perfect in every way. The bushings are the right thickness to keep the 3 shroud linkages away from the shroud. there is plenty of room for the wire linkages, the bushings work smooth with absolutely no binding. The fit and finish is just as it should be. Joe has made it so anyone can put it on frankly in a short amount of time. I have just shy of an hour start to finish and I have difficulty getting up and down onto the ground. If there are any questions, please ask but I can't see where there is an area that needs improvement.
The one thing the kit was missing was the spring on the arms. I believe Joe said we would have to find our own.
You will need Tecumseh spring 30202.
Doc
I received the throttle linkage from Joe and it was earmarked for an H50 I have for a roper. the throttle on the Roper was pieces and parts to make it work. Certainly nothing that was correct for the engine. So...
Joe's packaging is perfect for advanced mechanics and beginners. Anyone can truly do this conversion. In the package you will find 4 bags.


there are three bags...
Bag A

Bag B

and Bag C

which are the parts that will be on the shroud. There is also a linkage bag included for 2 linkages. one is for the shroud linkage to the governor and one is from the governor to the carb butterfly. All packaged separately in zip lock bags. What I found great about this is you only had to have the parts you were working on in front of you and on the bench. Absolutely NO losing parts this way. Joe also has them put together with bushings, washers and bolts/nuts as they should be on the shroud. Take a minute and look at them. Take a picture with your phone, lay them out in order. You can't make a mistake.
Also included in the box are a set of instructions and a template for drilling holes. My STRONG recommendation on the template is to xerox a couple of copies so when you get grease, tear it or give it to the dog in lieu of homework you will still have a template. You are probably going to want to cut them up to do this to tape the template to the shroud.
Unfortunately I have corrupt photos so I will work around the missing pics.
I cut the template out and drilled the holes. The template is such that you will lay it on the shroud and tape it with great ease. You really can't mess this part up. The template is pretty accurate as to how to line it up.
Here is the shroud drilled and the assembly of the shroud parts. This is a little frustrating as I had photos of the three parts assembled one at a time and the photos are not working. You can see that I only drilled the two holes for the C bracket. That was deliberate as I broke my drill losing a grip on the shroud and dropping it. It really isn't necessary.


I have the C bracket slightly off as I ripped the template off by accident dropping it on the floor after my drill motor crapped out.
Since the bracket is used only for the throttle cable and to hold the return spring, it made absolutely no difference.
Here is the shroud back on the bike...


Joe had sent the wrong linkage for the governor linkage so I used a spare wire linkage I have. Your kits will all include the proper linkages. Joe PMed me just after he sent it realizing the switch. His linkage is exactly as the original though.
Here is a video of the engine just after I tightened every thing up.
https://www.youtube.com/watch?v=pG1HiBFANHI
Gentlemen, I find this throttle just about perfect in every way. The bushings are the right thickness to keep the 3 shroud linkages away from the shroud. there is plenty of room for the wire linkages, the bushings work smooth with absolutely no binding. The fit and finish is just as it should be. Joe has made it so anyone can put it on frankly in a short amount of time. I have just shy of an hour start to finish and I have difficulty getting up and down onto the ground. If there are any questions, please ask but I can't see where there is an area that needs improvement.
The one thing the kit was missing was the spring on the arms. I believe Joe said we would have to find our own.
You will need Tecumseh spring 30202.
Doc
Last edited:
Hello to all. I am currently on vacation with my family. Just checking some e-mails. I will be returning home this coming Sunday. Kits will be available end of next week. I'll post in the for sale section. I will have 20 initial sets ready. 10 of the 20 are currently reserved from private PM's I have received. Leaving 10 up for sale on the first run. Price for 1 kit shipped is $70.00. If more than one kit is purchased, it would be $70.00 for one kit and $65.00 for each additional kit. If purchased at the same time. I have no problem making more. Just need to know interest at this time so I can order more of the torsion springs that are original Tecumseh springs.
Regards,
Joe51
Regards,
Joe51
I forgot to add...
I do apologize for not thanking DOCDC for his feedback on the first prototype kit and posting it to the site. Very much appreciated I assure you. It is important to me being in mfg. for the past 35 years to understand the customer's perspective first and foremost. I'll be sending him the correct link for the first kit and another kit for his inventory. Thank you DOCDC!
Regards,
Joe51
Hello to all. I am currently on vacation with my family. Just checking some e-mails. I will be returning home this coming Sunday. Kits will be available end of next week. I'll post in the for sale section. I will have 20 initial sets ready. 10 of the 20 are currently reserved from private PM's I have received. Leaving 10 up for sale on the first run. Price for 1 kit shipped is $70.00. If more than one kit is purchased, it would be $70.00 for one kit and $65.00 for each additional kit. If purchased at the same time. I have no problem making more. Just need to know interest at this time so I can order more of the torsion springs that are original Tecumseh springs.
Regards,
Joe51
Regards,
Joe51
joel
Thanks Andy,
your feedback is appreciated. I assure you. I will be making/assembling more once my Family gets back from Parris Island at the end of next week.
I am very proud to say, my youngest son will be graduating from Marine Boot Camp. Going on from there to become a Combat Engineer.
God Bless this Great Country !!!
Please let me know when you have a chance after install if you had any issues. Feedback is important to me.
Best Regards,
Joe

