Havasu Dave's - "Mini Bike" - (Just For Fun)

Earlier, I had posted I got the brake figured out. It worked great, until I mounted the engine and just didn't have the clearance for the darn cable. (Part of my recent engineering void frame of mind)

Old:


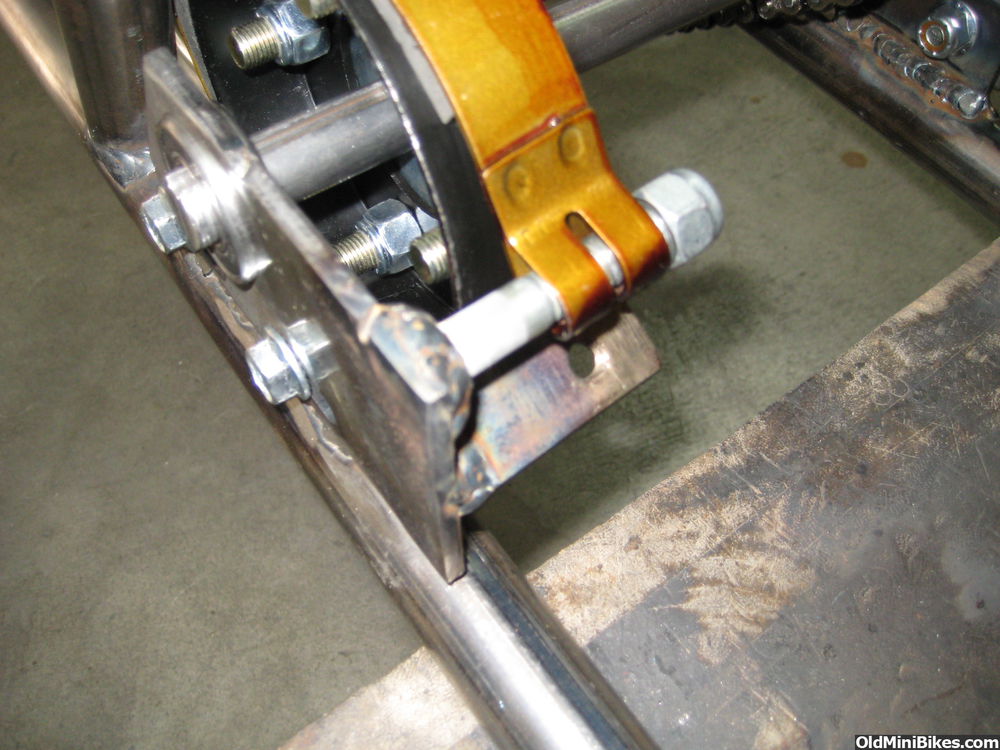
So I cut everything off the jackshaft plate for the third time, and attempt number IV was successful. The brake even works better, less drag, more of the groovy wrap-around deal we all know and love.

New:


As loose as it is on the photo, I still have some "brake" at the end of the lever range, and no rubbing. I ought to quit now and imbibe in adult beverages, however my Doctor said I had to slow down. Bunch of BS there. So now wife doesn't buy beer, and I am limited to three vodka and cranberry cocktails per day. There is just no joy in that. Don't even get to smash cans. It's just not a garage drink, ya know? And my garage refrigerator just sits there, looking forlorn.
 
In this picture, is the front of the bike to the left or right? The reason I ask is because band brakes grab good in one direction, but not the other. The rotation of the drum will pull the band around it tighter when installed correctly.
If in this picture, the front of the minibike is to the left, then then band brake isn't in the best position. The rotation of the drum will want to unclamp the band as it is applied. You can probably tell just by squeezing the brake and rolling the minibike forward and then backwards. The brake pictured will grab better going backwards (if the front of the bike is to the left).
This is my opinion and experience, others will vary.
Danford1

 
Looks nice. The undermount for the cable is not intuitive, so great problem-solving!:thumbsup:
Thanks Pete. I spent a lot of time experimenting with different pivot and cable termination points. While not ideal, this set up will lock up the wheel, and I can adjust it quite a bit tighter and still not require a compression spring between the pivot and cable swivel at the brake. Last night, it occurred to me that I'd done so much work in compressing and creating room between the engine and the JS, I could probably move the JS forward an inch. I am not sure it's worth it, cutting off the JS mount welds, fairing them, and rewelding a new base on. But that would "maybe" give me room to mount the brake so it pulls with rotation.

The brake pictured will grab better going backwards (if the front of the bike is to the left).
This is my opinion and experience, others will vary.
Thanks Dan. I smoke too much weed to grasp the higher engineering concepts of mini bike building. :pimp:
 
Well, thanks to Dan's astute observation of my back wards brake, I took the opportunity to flip it around and weld on a new step retainer tang. As Dan said, it works much better, and requires almost no pressure on the brake lever to come to a screeching, nut crushing, stop.

I'm geared WAY too high. Took it for a test spin just now, and lugged it, engine died, and now it refuses to start. I don't blame it one bit. I will try a number nine number nine number nine number nine number nine number nine tooth sprocket in place of the current elebin. Elebin is too tall.

I will try and take this important work more seriously in the future. For real. Mini bikes are serious shit. And I am a serious guy. For real.

Oh and....no advice needed on bitchy bastard engine. I'll buy it a dozen roses, or a new washing machine, and she'll be putting out in no time.
 
Dave just curious what Oil and ratio are you using? On my karts with two strokes I always use a lot of oil 16 to 1. But I do have to clean plugs sometines.
 
Dave just curious what Oil and ratio are you using? On my karts with two strokes I always use a lot of oil 16 to 1. But I do have to clean plugs sometines.
20:1 Ole. I am currently on weed eater oil, as the good stuff (Burris) contains castor oil which requires a bearing flush on these from time to time if they sit. Some have advised going higher with the synthetics, but I want to limit my bearing changes. 20:1 is the recommended ratio. The alky guys are going lighter on the oil as well.
 
Well, thanks to Dan's astute observation of my back wards brake, I took the opportunity to flip it around and weld on a new step retainer tang. As Dan said, it works much better, and requires almost no pressure on the brake lever to come to a screeching, nut crushing, stop.

I'm geared WAY too high. Took it for a test spin just now, and lugged it, engine died, and now it refuses to start. I don't blame it one bit. I will try a number nine number nine number nine number nine number nine number nine tooth sprocket in place of the current elebin. Elebin is too tall.

I will try and take this important work more seriously in the future. For real. Mini bikes are serious shit. And I am a serious guy. For real.

Oh and....no advice needed on bitchy bastard engine. I'll buy it a dozen roses, or a new washing machine, and she'll be putting out in no time.
Sorry Dave. I know it was a lot of extra work but for years to come you will appreciate the better brakes. I'm glad you changed it and I'm also glad you noticed a difference.
I put a clutch band brake on a mini last fall. I couldn't believe how effective that was. Just a light squeeze and it would lock the rear tire. It took a bit of getting used to :)
PS I kept the scrub brake on the bike for emergency's if the chain ever broke or fell off. That was a good idea too...

Danford1
 
Well, thanks to Dan's astute observation of my back wards brake, I took the opportunity to flip it around and weld on a new step retainer tang. As Dan said, it works much better, and requires almost no pressure on the brake lever to come to a screeching, nut crushing, stop.

I'm geared WAY too high. Took it for a test spin just now, and lugged it, engine died, and now it refuses to start. I don't blame it one bit. I will try a number nine number nine number nine number nine number nine number nine tooth sprocket in place of the current elebin. Elebin is too tall.

I will try and take this important work more seriously in the future. For real. Mini bikes are serious shit. And I am a serious guy. For real.

Oh and....no advice needed on bitchy bastard engine. I'll buy it a dozen roses, or a new washing machine, and she'll be putting out in no time.
Wow, Dave, that's a trippy sprocket you have! Maybe it got a little weed eater old on it.:shrug:
 
"Oh and....no advice needed on bitchy bastard engine. I'll buy it a dozen roses, or a new washing machine, and she'll be putting out in no time."
:) I knew Dave and I could do well together.
 
I'm back down in the weeds with this one fellas/gals. Crank end play is just excessive. Louie, whom some of you know, has been a huge help with advice. He's going to machine me a bearing spacer for the 6204 bearing on the PTO side. With some shims, I'll get the gap between that bearing and the snap ring retainer down to zero. I will relieve the crank where the bearing sits so it will slide on, instead of being pressed. That makes installation and end play measurement very simple.

On the magneto side, I will use one of [MENTION=31879]CarPlayLB[/MENTION] .010 gaskets which should bring total crank run out to that .010 free play.

I'm also going to make it breathe better, with a Tom Thorin made 580/700 intake stuffer, a US Motor 820 V reed assembly, and a 1" Tilly clone from Vince at California Vintage Karts. Should be gunpowder, gelatin, dynamite with a laser beam, guaranteed to blow your mind!

I also might, maybe, depending on if I feel like it, but would like to, move the jack shaft mounts forward one inch. That might relieve some of the chain smacking on the exhaust, even if I went to an 11t sprocket on that leg of the drive.

Once all of that is done, it all goes back together for the third time for another pre-paint and pretty test run. I'm not putting a drop of brush on barn paint on it, until it's right, quite right, bloody well right.
 
Hey, did ya all hear that loud POP? That was my head coming out of my ass. I did the crank shaft relieving for the PTO bearing, (it's a 6204 series, 47X20X14mm) and now that it slides on my crank, I am able to actually see the snap ring that holds it in. So I now have zero play there. Any end play will be at the magneto gasket, just like it's spoda be. Snap ring groove was buggered up, not allowing proper seating. There is also a roll pin there that MUST be used to set the open side of the snap ring in, as Markus said a few moons ago.
 
Hey, did ya all hear that loud POP? That was my head coming out of my ass. I did the crank shaft relieving for the PTO bearing, (it's a 6204 series, 47X20X14mm) and now that it slides on my crank, I am able to actually see the snap ring that holds it in. So I now have zero play there. Any end play will be at the magneto gasket, just like it's spoda be. Snap ring groove was buggered up, not allowing proper seating. There is also a roll pin there that MUST be used to set the open side of the snap ring in, as Markus said a few moons ago.
I had a few of those pops....over the Lil Nightmare.:laugh:
 
I had a few of those pops....over the Lil Nightmare.:laugh:
LOL, Lil Nightmare. At least you won. Once again, a case of "learning curve," and me not doing something right, or not knowing. Winning, or making progress is what makes this fun, and I suspect in my case, keeping me sane enough to avoid arrest, commitment, or old timers disease.

Glad it was not my gaskets! :thumbsup: Tom makes some nice stuff too! I make gaskets for him too!
Your gaskets were perfect. I cant see ever requiring a .015 on the mag support plate side, since .010 is what you shoot for. Those "X" style 580/700 reeds you cut also fit perfect, and sealed well. Do you cut the 820 V-cage reeds? I need some if you do. Tom took a personal check from a stranger. I've met some very nice people doing this project. Tom's vintage kart collection is beyond belief.
 
Well folks, I moved the jack shaft up one inch. After I cut off the original welded on plates, I needed to make another set. The sole purpose of doing this was to give a bit more clearance between primary chain and exhaust. The brake works well in this position, although if I'd had the room in the rear of the assembly before, I'd have affixed the anchoring and actuation bits, aft for a top-entry brake. But this is probably better, as it keeps the brake cable out of the tank, and off the frame where it's visible.

Also fabricated some foot pegs. Note how short the frame is in front, by design. This also causes everything to be shoved towards the rear, except that the foot pegs would not function there. First off, they'd be very wide to get my legs and feet out of the shroud and chain. Secondly, it would have forced my knees into the bars, and would have necessitated designing folding pegs.

So these are a compromise that I like. Very strong, made from repurposed Cat 250 scrub brake arm. They will not hit the ground until after the crash- they wont be the cause of one. :laugh: I will pad them with BSA shifter pads, for the mean, clean, James Dean thing. :scooter:

96.75% of the fabrication flagellation is conflugermated.

 
Top