Havasu Dave's - "Mini Bike" - (Just For Fun)

Dave...I like what you are doing here! That mount is awesome! ...and yes, Vince is a great guy to deal with and has great parts!
As a thought...I believe the reed block on that engine can be flipped over and the carb can have a straight pull for the throttle, but that will put the bowl at the top, which some guys don't care for...they say it will leak into the crankcase...I dunno, just a thought. If you want to try it, I know a guy, that knows a guy, that has the gaskets for it!
As a thought...I believe the reed block on that engine can be flipped over and the carb can have a straight pull for the throttle, but that will put the bowl at the top, which some guys don't care for...they say it will leak into the crankcase...I dunno, just a thought. If you want to try it, I know a guy, that knows a guy, that has the gaskets for it!
As a thought...I believe the reed block on that engine can be flipped over and the carb can have a straight pull for the throttle, but that will put the bowl at the top, which some guys don't care for...they say it will leak into the crankcase...I dunno, just a thought. If you want to try it, I know a guy, that knows a guy, that has the gaskets for it!
")
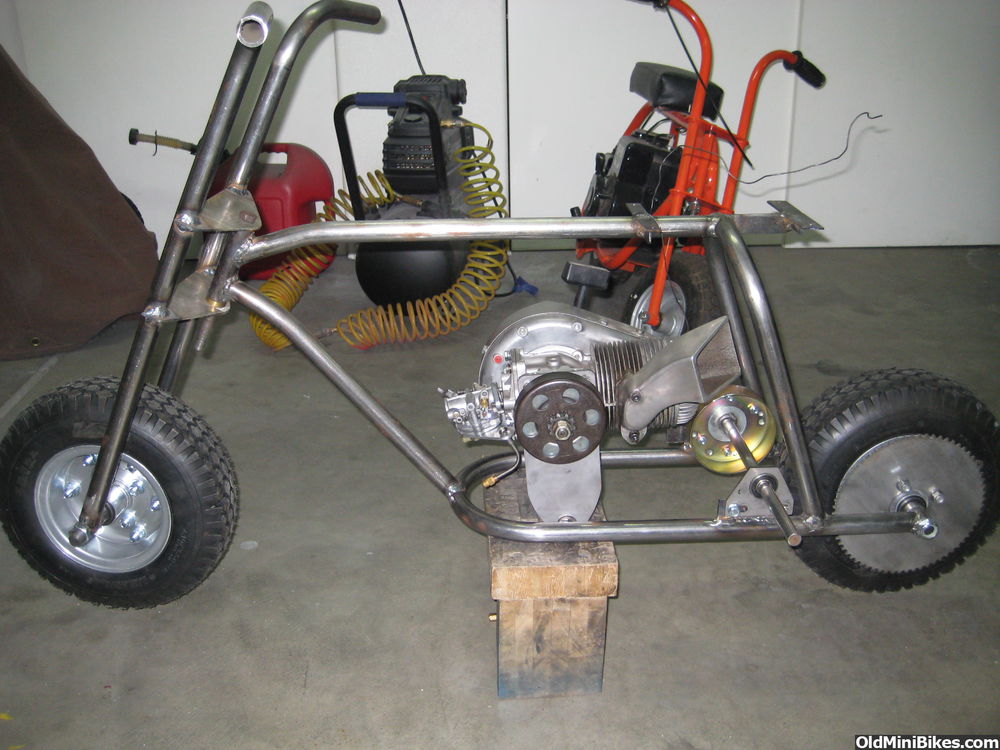
If I said I wasn't a little intimidated by this engine, I'd be lying, but so far, I find it extremely simple. (Jinxed it, didn't I)
What shade or color code is the silver you used on the rims? I like it . Danford1
I got this engine mount from California Vintage Karts. Vince is a great guy to work with. This particular mount is a re-pop from the setup used on the Go Kart Big Bear Scrambler in 1959.
Doug
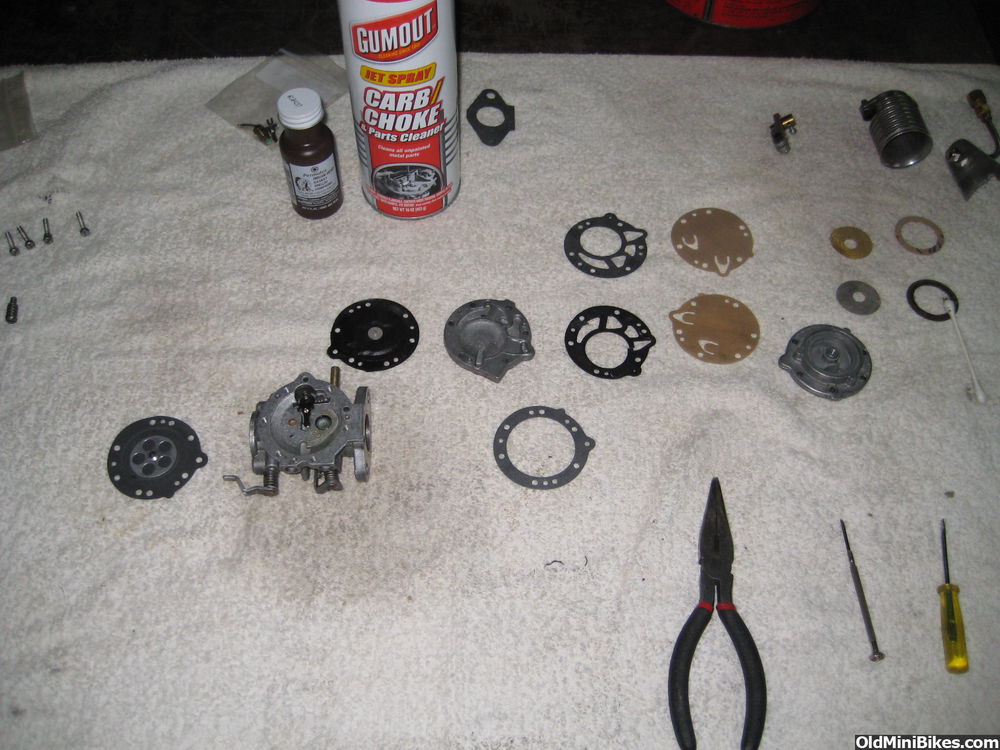
This 580 uses a Tillotson 189E single stack. Soaked it in Berryman's over night, scrubbed, blew, carburetor cleaner, new gaskets, and was surprised to find the fulcrum (which controls the fuel supply needle) was adjusted well below flush. I don't know how it pumped before, but I do know why it would quit for no reason. (I hope) :laugh: Good old fashioned Permatex shellac to seal the one plug.
I got this engine mount from California Vintage Karts. Vince is a great guy to work with. This particular mount is a re-pop from the setup used on the Go Kart Big Bear Scrambler in 1959.
I gained about 1.25 inches from the aluminum plate mount, and now have clearance for everything.
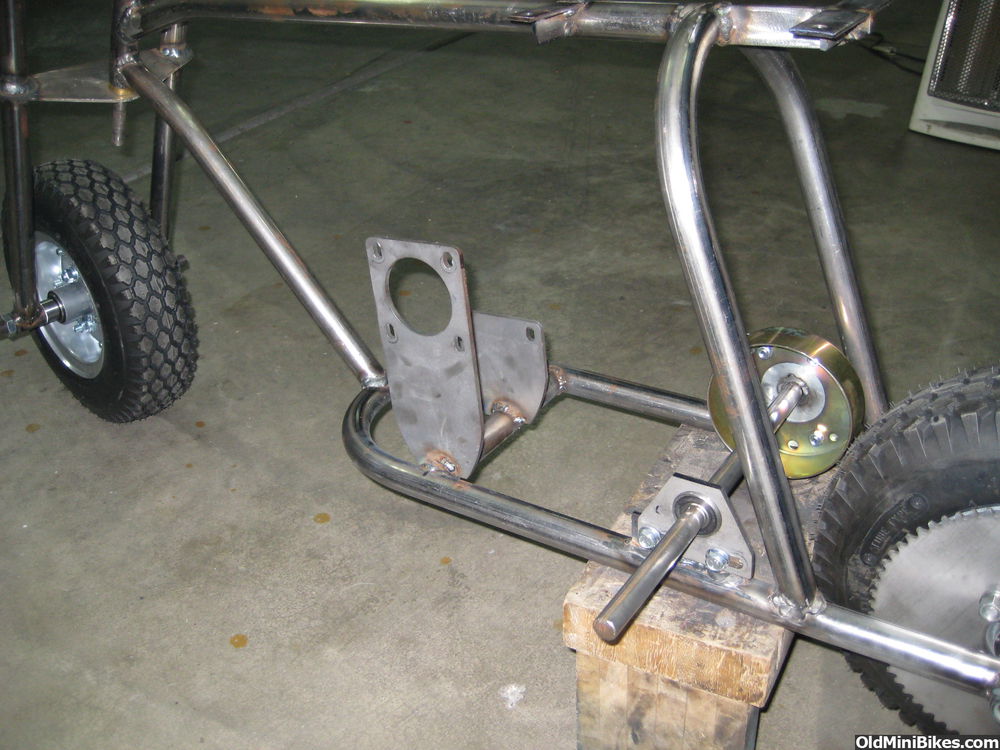
Setup before welding in place. Yeah, carb is hanging, and note that little brass nut and ferule I almost lost. (grin)

I got this engine mount from California Vintage Karts. Vince is a great guy to work with. This particular mount is a re-pop from the setup used on the Go Kart Big Bear Scrambler in 1959.
I gained about 1.25 inches from the aluminum plate mount, and now have clearance for everything.
Setup before welding in place. Yeah, carb is hanging, and note that little brass nut and ferule I almost lost. (grin)
Was the engine mount one piece including the cross tube? I keep looking at the pic and getting confused as to what's your work and what's the repop....:shrug: Cool solution.
No, I cut and coped the tube and then welded the plate on with the engine fitted. Irony- the tube is a piece from my Flexo project a few years ago, and the mount originates from a 59 go kart cycle big bear, which is where the Flexo originated.
I like the mount! A simple but effective solution to the chain clearance issue. What about 3 or 4 lightening holes in the flat side of the mount to create an added feature that takes away from the flat expanse? :shrug: Draw them on it and look at them for a week before you drill it.... Doug

That engine mount is just a great Idea....simple but very strong. :rockon: What a great way to clearance the engine to jack shaft ! :thumbsup::thumbsup:
I've disassembled the engine and stripped off both the original paint, and the "Ebay Seller Rattle Can paint. I use paint stripper, 3M pads, and elbow grease. No blasting is used on my bikes, or engines.
Once the crankshaft had been removed, I decided it would be prudent to replace all bearings and seals. The PTO bearing needs to be pressed out, or pulled. I seated the crank in a jig and tapped the bearing off with a cold chisel. This area of the crank will be machined down to accept the new bearing without applying pressure. It is held in place with a C-clip.
The PTO Bearing Part Number is 127910-2, and the PTO Seal is Part Number 31146.
The magneto side needle bearing and seal will also be replaced. It is necessary to heat the aluminum to 150F to facilitate this. The Magneto side Needle Bearing, is a Torrington, Part Number B-126, and the Magneto side Seal is Part Number 2770146-1.

Member OND gives a good write up on some of these aspects in his thread here as far as tearing these down and removing C clips and rod bearings.
I have been trying to come up with paint designs for the engine. I am not a fan of polishing aluminum, because no matter what, at some point, you are going to be polishing it again, even though it looks stunning. Clear coat will dull the polished aluminum, and paint looks like....paint. This is a US Motor product, not a West Bend, Chrysler Power Bee, etc. So it was painted silver with a black recoil right out of a Tecumseh.
But at least I am THINKING about it, LOL. Also wondering if I should go with a Black Mamba cam, or a CL-1, and just use 18 LB valve springs. :innocent:
Almost forgot- Louie Figone has exchanged countless emails with me on various aspects of this. He is setting the carb pop off pressure for me as well. Should be good, as I used original spring, but nice to have a master look at that carb for me.
Once the crankshaft had been removed, I decided it would be prudent to replace all bearings and seals. The PTO bearing needs to be pressed out, or pulled. I seated the crank in a jig and tapped the bearing off with a cold chisel. This area of the crank will be machined down to accept the new bearing without applying pressure. It is held in place with a C-clip.
The PTO Bearing Part Number is 127910-2, and the PTO Seal is Part Number 31146.
The magneto side needle bearing and seal will also be replaced. It is necessary to heat the aluminum to 150F to facilitate this. The Magneto side Needle Bearing, is a Torrington, Part Number B-126, and the Magneto side Seal is Part Number 2770146-1.
Member OND gives a good write up on some of these aspects in his thread here as far as tearing these down and removing C clips and rod bearings.
I have been trying to come up with paint designs for the engine. I am not a fan of polishing aluminum, because no matter what, at some point, you are going to be polishing it again, even though it looks stunning. Clear coat will dull the polished aluminum, and paint looks like....paint. This is a US Motor product, not a West Bend, Chrysler Power Bee, etc. So it was painted silver with a black recoil right out of a Tecumseh.
But at least I am THINKING about it, LOL. Also wondering if I should go with a Black Mamba cam, or a CL-1, and just use 18 LB valve springs. :innocent:
Almost forgot- Louie Figone has exchanged countless emails with me on various aspects of this. He is setting the carb pop off pressure for me as well. Should be good, as I used original spring, but nice to have a master look at that carb for me.
Last edited:
What's with the torque wrench Dave? :shrug: I thought all the seasoned builders joints popped at the correct torque settings of any given two stroke engine!! :laugh:
Love that engine mount!!
Love that engine mount!!
In between sharing smarmy, angry old man posts on the internet, I decided to shoot the shroud purple. The overlaying theme of the bike color will be a purple, and I had this laying around for a few years. It is an acrylic enamel (Ful Cryl from Nason) which is a single stage paint. What single stage means is that there is no top coat of "clear" urethane required over it. It is catalyzed chemically with a "hardener" at an 8:1 ratio. It is fuel proof. Contrary to what might be out there, nothing vintage was ever painted using these chemicals in the 70's, except for European cars, and a very few customized, high end after market jobs in the US. The reason for this was that mottling occurred in early US attempts at using this, or it's urethane cousin.
Vintage mini bikes were generally painted with enamel, sprayed or dipped, and usually baked.
This particular color I think I found on a chip at Napa, but I cant recall. It's got both metallic and the smaller pearl in it. Photo doesn't do it justice. It is just as smooth and shiny as a two stage application would have been. Do not waste your expensive clear coat when you can use single stage. Do not assume you can't do this on your own, in the privacy of your own home. It is easier than using a hardware store rattle can. Trust me. The only bad part is cleaning the gun. Cleaning the gun sucks owl shit, and is a necessary evil.