Muskin Dune Cat Find! (Help Needed!)

#81
https://hent.com/engine-Mounting-Plate-5-x-12-flat/

Hent, top of the page.
Check there first, please. he owns this site, too.
Thanks! unfortunately, none of the plates on Hent's shop are an exact fit, i was out of town at the time so i couldnt get the measurements on my own.
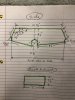
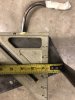
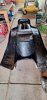
I've taken some photos of the actual motor mount "box." but if noone has the measurements, ill just take them myself and post my findings here for others.

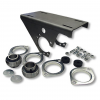
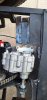
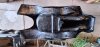
heres photos of one of the original mount "box" things. See how the mount is longer, and bent at an angle to meet the sides? that's what i was looking for.

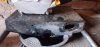
i just ended up picking up a 3x4 sheet of 1/8th steel, since the original is 1/8th thick.
 

Attachments

#83
#84
I draw up some measurements for you. I don’t know how to measure the angles with the frame tube in the way. I can send pictures with a tape measure of different spots if needed C8BD98A7-9629-4573-95A6-322500ABFEE0.jpeg
 
#87
I draw up some measurements for you. I don’t know how to measure the angles with the frame tube in the way. I can send pictures with a tape measure of different spots if needed
youre an actual champion. thank you SO much, ill get that angle tomorrow morning, ive got a protractor that can measure that small spot.

thank you SO much!
 
#88
If it helps any the circumference the corners that’s welded to the tube frame is 3/4” (moon crescent shape) total counting the two different plates that are welded together that form the corner of the box
 
#89
Alright. I think I've managed to put together a somewhat readable mechanical drawing of the motor-mount-box-thing.
Here it is, in all of it's glory. Of course,I expect folks to have questions or corrections. I kinda just threw it together.

Yes, I know the formatting is horrid.
Yes, I know autocad is free for a short time.
No, for some reason it does not install on my computer. I don't know why, and I don't want to figure it out. I'm tired of fixing technology problems :D

Here it is, in all of its scuffed glory!

MotormountMechdiagram1972MuskinDuneCat-Liviflame-OldMiniBikes.com.png

Here is an Imgur album of the photos I took for some measurements. I appologize for the quality of some. But I'm insanely lazy.
Photos of measurements
 
Last edited:
#90
Pretty pictures. Try making a mock one out of stiff cardboard to see if it fits your frame. If it’s good, make the real one, weld it to the frame. Install the axle with the inner flanges and bearings. The outside bearings and flanges (next to rims) bolt to the frame tabs (not welded to frame yet) make sure all is square then weld the tabs to the frame. To me it’s an easy way to make sure the axle and bearings fit. The front spindles are angled a bit. The side view of your original frame will show you. I never noticed it when the shell and tires were on mine
 
#91
Pretty pictures. Try making a mock one out of stiff cardboard to see if it fits your frame. If it’s good, make the real one, weld it to the frame. Install the axle with the inner flanges and bearings. The outside bearings and flanges (next to rims) bolt to the frame tabs (not welded to frame yet) make sure all is square then weld the tabs to the frame. To me it’s an easy way to make sure the axle and bearings fit. The front spindles are angled a bit. The side view of your original frame will show you. I never noticed it when the shell and tires were on mine
ooh, that's why you mentioned angling them 8°, ill take a look tomorrow when I'm not completely beat.

great idea with the cardboard too! that'll make fixing one up lots easier.
 
#92
quick update! I've got the front end almost completed, last few things is beefing up the steering area and putting on the rear body support bars.

I'll have the rear axle done today, aswell. save for the torque converter I've got.

I've also found something out. the snap rings that go inside the series 100 peerless diff are .669 HEAVY DUTY snaps, not the m20 metric ones. the heavy duty ones are the correct thickness!
correct ones on the left, m20s on the right. the m20s would probably work, but i just like the idea of using one that's right, than two that work.
 

Attachments

#93
Alright.
I'm unfotunately stopping the project for another year or so, might be less, but alas.

I managed to get it together completely, motor mounted, gearbox mounted, everything together, and it did move under its own power.
however, because it wasnt stable enough, the chain fell off only ~20 feet from where i started.
When i get back to it, ill finish the entire thing up, getting it painted, getting the wheels redone, and properly bracing the drivetrain so the chain doesnt pop off.

Thanks everyone for your help thus far, I hope to come back and finish the project finally!
 
#94
I am back!

Last final things I've got planned to do is paint the body I purchased from Keisler, and fix the gearbox moving around under load.
I've only got about ten days to knock it out, but we'll see how much I can do!

Looking at paints, I'm thinking about getting a nice color-shift pearl, and some big flake, I found a nice looking company that does old Hot-Rod style paints and flakes, RothMetalFlake.com , I'll shoot 'em an email and see if they've got what I'm looking for!
 
#97
Here's some photos of the finished chassis!

I've got the extended body off the top for now, I've got to sand and paint it, so I've washed it off and put it aside.

The aftermarket gearbox that I got needs to be repositioned, right now its too far to the right side, so the chain skips off both the drive gear and the input gear (It also needs an immense amount of reinforcement, the mount I've got it on at the moment is able to be swayed by hand).
 

Attachments

#98
Here is the paint I was hoping for, also. The first image is "Spina's Black Powder Rattlebomb" from the rothmetalflake Folks, they've even got a very close to original BAD AZZZ blue flake and paint, but I want to make this a little more than just an extended original.

The second image is some Assassin supershift pearl I found on Amazon. Its got decent reviews and I'm not trying to make it the most professional. Half of this project is just Bodge work anyway :D
 

Attachments

#99
It seems the gearbox that I've gotten is just poorly made, the mounting bracket on it Bent under load, which is why I cant seem to line it up properly. Ill have to fabricate my own in the next few days.
20250430_163833.jpg

Other than the fact that my cheapo amazon gearbox isnt living up to its name, I prepped and painted the underside of the body with an epoxy black protective coat! Gave it a VERY light sanding and just hit it with the epoxy paint, It said specifically not to use a primer, so I didnt. It turned out okay!
(There are no wet spots! that just smooth areas without exposed fibers that made the paint a glossy color, I dont mind, since itll be under me.)
20250430_182225.jpg 20250430_182148.jpg 20250430_182209.jpg
 
Alrighty! I've hit it with a little 120 grit, Ill be moving up from 120, to 220, 360, then 400, some by hand.

I think the 120 did quite a good job making it look better already!

Before:
20250501_093406.jpg 20250501_093425.jpg 20250501_093358.jpg 20250501_093350.jpg

After:
20250501_103245.jpg 20250501_103305.jpg 20250501_103237.jpg 20250501_103228.jpg
 
Top