News-Flash!!!!
...Getting ready to ship this Bonanza 1300 frame to Smallbore ..the jackshaft bearing were toast so I decided to take them out (save on shipping weight :laugh") and use the opportunuty to show Kk jr. a trick or two.
and use the opportunuty to show Kk jr. a trick or two.
Of course this may be old hat for the seasoned veterans....so you smarty-pants' can change channels now...this is for the folks who may be tackling it for the first time or who have struggled with it in the past.
Now's a good time to spray the area with some penetrating oil...grab a cup of your favorite beverage and psych yourself up for the job at hand.....
The bearings are a press fit in the frame....no retaining groove/clip ....but to try and beat them out is a mistake, especially after all these years those baby's are really stuck...you run the risk of bending the flange or distorting the hole...:doah:...you could use "heat"...but maybe you don't want a flamed paint job or you think the bearings can be re-used.....there's an easier way...."press" them out.
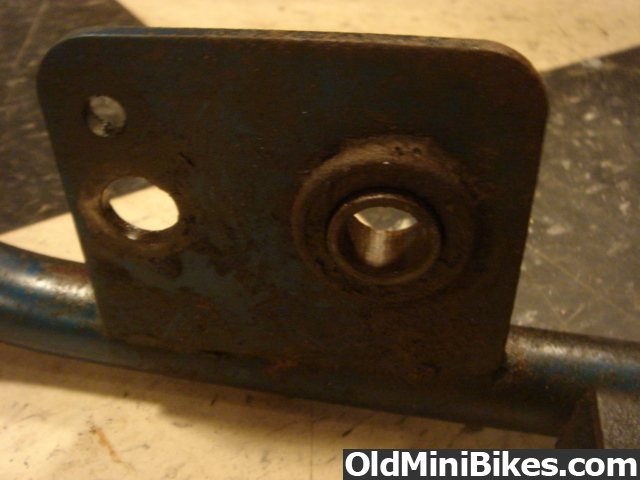
The thing to remember here is you want to press on the outer bearing race to remove or replace a bearing of this type...never press on the center or inner race, especially if you are planning on re-using the bearing.....if you apply force to the inner bearing race you will destroy the bearing !!!
Start by rounding up a piece of 1/2" threaded rod, some heavy washers and two nuts....
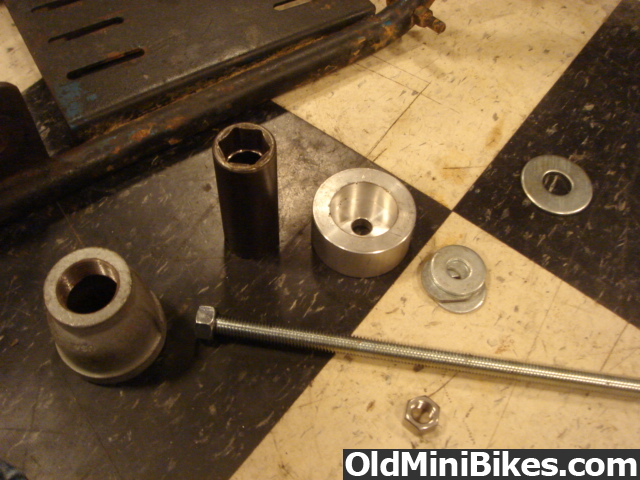
On the outside you need "cup" that is slightly bigger that the O.D. of the bearing...it should be made of steel or aluminum or any material strong enough to withstand the force that is to be applied....I don't recommend wood or plastic.
I have some fancy ones I made over the years of turned aluminum but I'm gonna use just a pipe fitting here just to show you can use whatever you might have on hand. Even a short length of black pipe or a "close" nipple will work, as long as it is perfectly "square" ... by that I mean flat and parallell on the ends. Don't use a piece of tubing or pipe that is crooked or tapered on the ends...The idea here is to provide strong even support around the outside of the bearing yet allow room for the bearing to press out. You will also need a large diameter, thick washers or piece of steel with a 1/2" hole in it to cover the end.
On the other (inside) you will need a piece of round stock that is just slightly smaller than the OD of the bearing (1-3/8" in this case) ....this will also need to have a 1/2" hole in it for the threaded rod to pass through. An impact socket works perfect for this as they are usually heavy wall....a short one would be perfect but I'm using a deep socket....in this case I chose a 15/16" socket. (Measure the outside of the socket to be sure it's not greater than 1-3/8" because it has to pass through the frame). A socket also works well because it wont press on the inner bearing race as was mentioned above....many times the inner bearing race stands proud of the outer race so you want to be sure you are not pressing on this...you want to press on the outer race.
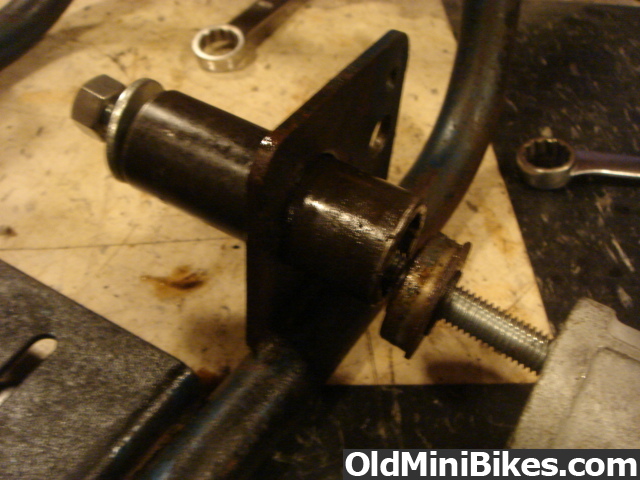
Ok assemble this whole deal as shown here...
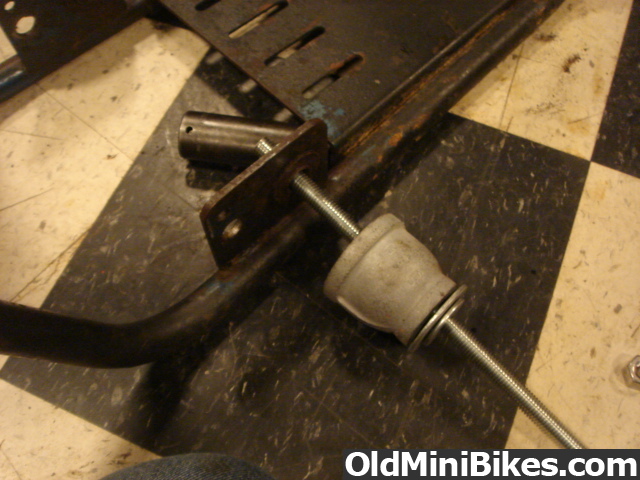
use a heavy washer on top of the socket so the nut bears down on it....good idea to grease the threaded rod and nuts with some high pressure wheel bearing grease, never-seeze, etc...so it operates smoothly under load...run the nuts up by hand while keeping everything centered ..
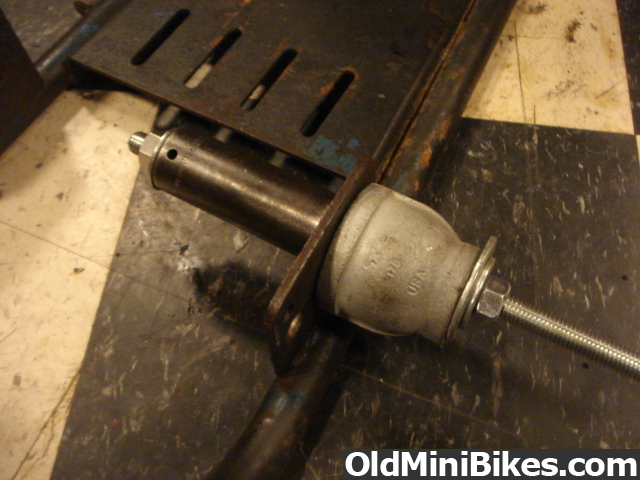
..again make sure the socket wall or driver is bearing against the outer race of the bearing only....then get two long wrenches and start cranking on the nuts to draw the bearing out....some of these suckers are tight so be prepared to go at it in small increments...usually once it "pops" free it will start to move easier. When the socket nears the frame flange be sure it is still centered so it can finish pressing the bearing through and pass through the frame itslelf...
Presto....done and you didn't (hardly) have to use any bad words.....
You can also use this same process in reverse to replace the bearings.....just be sure everything is clean and aligned straight before pressing them in...again...always press on the outer race only!!!
There is a chance the new bearings can be tapped in if you support the flange ....or maybe there are better ideas out there but this is how I do it.....:shrug:
Now back to our regular scheduled broadcast....
.
...Getting ready to ship this Bonanza 1300 frame to Smallbore ..the jackshaft bearing were toast so I decided to take them out (save on shipping weight :laugh
and use the opportunuty to show Kk jr. a trick or two.Of course this may be old hat for the seasoned veterans....so you smarty-pants' can change channels now...this is for the folks who may be tackling it for the first time or who have struggled with it in the past.
Now's a good time to spray the area with some penetrating oil...grab a cup of your favorite beverage and psych yourself up for the job at hand.....
The bearings are a press fit in the frame....no retaining groove/clip ....but to try and beat them out is a mistake, especially after all these years those baby's are really stuck...you run the risk of bending the flange or distorting the hole...:doah:...you could use "heat"...but maybe you don't want a flamed paint job or you think the bearings can be re-used.....there's an easier way...."press" them out.
The thing to remember here is you want to press on the outer bearing race to remove or replace a bearing of this type...never press on the center or inner race, especially if you are planning on re-using the bearing.....if you apply force to the inner bearing race you will destroy the bearing !!!
Start by rounding up a piece of 1/2" threaded rod, some heavy washers and two nuts....
On the outside you need "cup" that is slightly bigger that the O.D. of the bearing...it should be made of steel or aluminum or any material strong enough to withstand the force that is to be applied....I don't recommend wood or plastic.
I have some fancy ones I made over the years of turned aluminum but I'm gonna use just a pipe fitting here just to show you can use whatever you might have on hand. Even a short length of black pipe or a "close" nipple will work, as long as it is perfectly "square" ... by that I mean flat and parallell on the ends. Don't use a piece of tubing or pipe that is crooked or tapered on the ends...The idea here is to provide strong even support around the outside of the bearing yet allow room for the bearing to press out. You will also need a large diameter, thick washers or piece of steel with a 1/2" hole in it to cover the end.
On the other (inside) you will need a piece of round stock that is just slightly smaller than the OD of the bearing (1-3/8" in this case) ....this will also need to have a 1/2" hole in it for the threaded rod to pass through. An impact socket works perfect for this as they are usually heavy wall....a short one would be perfect but I'm using a deep socket....in this case I chose a 15/16" socket. (Measure the outside of the socket to be sure it's not greater than 1-3/8" because it has to pass through the frame). A socket also works well because it wont press on the inner bearing race as was mentioned above....many times the inner bearing race stands proud of the outer race so you want to be sure you are not pressing on this...you want to press on the outer race.
Ok assemble this whole deal as shown here...
use a heavy washer on top of the socket so the nut bears down on it....good idea to grease the threaded rod and nuts with some high pressure wheel bearing grease, never-seeze, etc...so it operates smoothly under load...run the nuts up by hand while keeping everything centered ..
..again make sure the socket wall or driver is bearing against the outer race of the bearing only....then get two long wrenches and start cranking on the nuts to draw the bearing out....some of these suckers are tight so be prepared to go at it in small increments...usually once it "pops" free it will start to move easier. When the socket nears the frame flange be sure it is still centered so it can finish pressing the bearing through and pass through the frame itslelf...
Presto....done and you didn't (hardly) have to use any bad words.....
You can also use this same process in reverse to replace the bearings.....just be sure everything is clean and aligned straight before pressing them in...again...always press on the outer race only!!!
There is a chance the new bearings can be tapped in if you support the flange ....or maybe there are better ideas out there but this is how I do it.....:shrug:
Now back to our regular scheduled broadcast....
.
Last edited:


