The Official Pinewood Derby Thread

T-Town Mini

Well-Known Member
#21
I only made one car that was an extended wheelbase car. I never raced it, though.

Here it is:


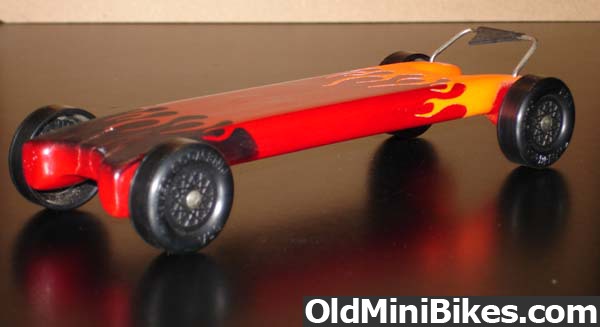
The principle behind this design is to start the race a full inch ahead of the other cars. The starting peg rests in the insert and the bar up front flags the electronic timer as it passes over the finish line.

Is it cheating? It never was entered in a race so I'll never know. I chose to run the light blue car instead and I kept this car underwraps even though I had it with me for the divisional race.

This is where those pesky rules came into play. I wasn't allowed to test the car head to head with my light blue car to see which was fastest. The organizers said no one was allowed to use the tracks and only those cars entered would be handled by race officials during the race. Oh, well.

The light blue car had finished 1st place in the pack race earlier in the year but, wound up finishing second in the divisional to an extended wheelbased car.

I believe this one would've given that other extended wheelbase car some competition. What do you think?
 
Last edited:
#22
I only made one car that was an extended wheelbase car. I never raced it, though.

Here it is:


The starting peg rests in the insert and the bar up front flags the electronic timer as it passes over the finish line.

Is it cheating? It never was entered in a race so I'll never know.
Cheating is a strong word, but it may not be ethical. I doubt they would have allowed it. In the races I facilitated, we would align such a car offset from center if possible, or be forced to run it backwards. What's odd is that there are no consistent rules. What was legal (or illegal) at our pack race was often different at the district level.

You may not get the advantage you hope for with the electronic timer. Most timers use a light beam that is positioned in the center of the track, about the size of an LED. Depending on the spread of the light (not much), your car may not trip the light until it's already an inch past the line. I suppose the flag might do the job but still, they would probably disqualify it based on the cutout.
 
Last edited:
#23
Our rule sheet filled an entire 8.5x11 and tried to mimic the district rules to prevent surprises if the car made it to district. We did allow extended wheel base. It's a major advantage. We also allowed rail running with bent axles and raising one wheel off the track. Axle tips had to be visible to ensure they were original nails.

My formula for winning was to concentrate the weight at the rear and as low as possible. Center of gravity should be just in front of the rear wheels on a stretched base. I would polish the hubs with graphite by reaming them with the paper stick from a q-tip dipped in graphite and mounted in a variable speed drill. Then I would spend an hour or more adjusting camber and toe until the car ran completely straight and the wheels didn't run in on the body or out on the head of the axle. I used tiny slivers of waxed paper for axle shims. I'd match and true the wheels, bevel the axle heads slightly, micron polish the shaft. It was ridiculous. I bet we had 20 hours in a car and usually about $80-$100.

Watch the movie "Down And Derby". You may be ashamed of yourself. I know I was. It should be required viewing by all dad's before the kits are handed out. It should be about time teaching your son, but it's sure easy to get carried away. I fell in that trap the first year along with most of the other dads.
 
#24
Funny part is we beat out people using illegal wheels
I remember the same thing, our wheels were regulation, everyone else was running the wheels with the bevel on the inside edges.

Well i do feel slightly better knowing that we weren't the only ones who had politics enter into the equation lol.
 
#25
My favorite car over the years was one a friend of mine made for the open class dad's race. NO rules whatsoever. It was a riot. He glued a large can of pork-n-beans to a thinned down base. That was it. He said it was "gas powered". It literally crushed the competition. A few times it jumped into the next lane nearing the timer an take out the car next to it. It nearly destroyed the finish gate too. The next year we had to restrict the maximum weight to 8oz. Interestingly, the added weight didn't necessarily make it a winner. I had 5oz cars that would beat my 8oz "open race" car. So many factors all have to combine to make a winner, with a healthy dose of dumb luck.
 
#26
I had one guy show up at my house for car inspection and turn in 2 days before the race. He had a freshly painted (still sticky) blue wedge. He was clueless. Literally a doorstop wedge, one cut, no sanding. I drilled the axle holes for him and we added the wheels, added some graphite, that was it. No axle polishing or filing, no alignment. Just a little added weight at the rear to get it close. It won everything and went on to district.
 

KB2ROCKET

Active Member
#27
if I had a son that needed to build one of these
I would let him build it himself
when I was a cub scout I built mine my self and it looked real bad but I built it my self
and that was the whole point
.
 
#28
...It should be required viewing by all dad's before the kits are handed out. It should be about time teaching your son, but it's sure easy to get carried away. I fell in that trap the first year along with most of the other dads.
if I had a son that needed to build one of these
I would let him build it himself when I was a cub scout I built mine my self and it looked real bad but I built it my self
and that was the whole point.
My dad was an engineer. He helped me and my brother build our cars. He didn't get carried away, but he knew what to do and guided us well. It was a fun deal.

No kids? Not to worry. See if there's something like this in your area and then feel free to get carried away. My friend in Fargo, ND, organizes this one. It's for 21 and over, plays out in a tavern and benefits the local VA hospital. It's the only kind of racing I know of where the drivers get to have a beer during the race.

Pinewood Derby competition benefits the Fargo VA Hospital | WDAY
 

KB2ROCKET

Active Member
#29
My dad was an engineer. He helped me and my brother build our cars. He didn't get carried away, but he knew what to do and guided us well. It was a fun deal.

No kids? Not to worry. See if there's something like this in your area and then feel free to get carried away. My friend in Fargo, ND, organizes this one. It's for 21 and over, plays out in a tavern and benefits the local VA hospital. It's the only kind of racing I know of where the drivers get to have a beer during the race.
.


Pinewood Derby competition benefits the Fargo VA Hospital | WDAY
I wish I had a picture of my old car it was basicly the block of wood then i took a hack saw and made one cut and cut the front upper corner off the block so you could tell that that end was the front .... the kits were a little differnt back then Pinewood Derby History - Story by Don Murphy they were basicly a 2x2 with a cutout for about where the driver would sit and on the bottom their was 2 channels for axle supports then those supports had channels for the axle .... it was as if they intended that you build your car in the soap box derby style. anyway after i got it together i spray painted the crap out of it with every color I could find ... my dads envolvment was telling me that if i expected it to roll i needed to get the paint off the axle and the bottom of the wheels :)
 
Last edited:

45t

Well-Known Member
#30
My son is a first year Webelos and we've enjoyed doing the derby for 3 years now. He only has two more years of racing before he ages out of cub scouts. Each year we enjoy building the car. We've always went with the wedge design and it has proven itself as a winner. There has been refinement of the design for sure over the years we've raced, thinner wedge wood body and more weight over rear axle. Each year we learn a little more to make it slightly faster. We can easily identify the illegal cars or purchased cars at the races and so far my son's cars have beat them. I'm not a "Down and Derby" dad (see the movie and you'll understand the reference), but I do make sure that my son's cars wheels, axles and alignment are spot on.

I did pinewood derby when I was a cub scout and I have fond memories of winning and losing. My first car I did completely myself (my dad didn't know he was suppose to help me). It was a wedge design only because it was cut by me with a hand saw. I didn't prep the wheels or axles and just crammed them on the car. The car didn't even make it close to crossing the finish line and as a little kid I was bummed out, not that it didn't win but that it couldn't even keep up and finish. My dad was at the races that day and he was embarrassed and he got involved after that and my following cars did a lot better. I laugh about my first car experience now, but I've told the story to my son so he understand about doing it together as father and son. Now that he is older I want him to do a lot more advanced building of the cars. He has already designed, cut, sanded, painted and assembled the cars, but I'm going to start teaching him this year how to tune the car.
 

T-Town Mini

Well-Known Member
#31
Pinewood Derby Tips:

Always start out by drawing up a design on paper before making any cuts to the block of wood. Then, use your drawing to make a pattern so that it can be easily transferred onto the block. I made these out of some stiff cardboard and a strip of wood.


For the open division, I used a piece of trim which matched the outer dimensions of the BSA kit exactly. The only difference was it was thinner and no axle slots. I drilled the axle locations on a drill press in order to try and keep it as square as possible. (For the Scout classes, my son always use the original kit materials, block, axles & wheels, etc.)


In the above photo, you may be able to see how the front section is not flat along the bottom but is raised up to be approximately inline with the axles. This is to remove any possibility of it making contact with the track sections. My dark blue formula looking car was completely flat on the bottom from nose to tail and did indeed make contact in one run causing it to lose the race. So, make sure the ride height of the car is more than sufficient to clear any obstructions.

The next photo shows how the bottom was routed out to allow for weight to be added. For earlier designs, I used the flat weights from Pinecar (as seen on the first photo on page 1) inside the car which still required adding additional weight...usually by drilling holes in the rear. For later cars I used lead weights I made from a mold to fit the routed out slot. It was easy to remove weight by drilling holes in the bottom of the car to meet the 5oz maximum the day of the race.


After transferring the pattern on the block and drilling out the axle holes, etc. it's now safe to begin shaping the wood into a car. A band saw is preferable but it can be done with a hand saw...which is what my son and I did before getting one. For this car design, I actually made a jig to hold the block since it was so thin. I attached the block to a pivot and cut the top in a continuous arch using the band saw. Then, follow the lines making cuts along the sides roughly matching the drawn pattern. Use a wood rasp and a sanding block to finish the car's shape.


Sand the front and back edges to make the length approximately 6 7/8"...once sealer and paint are added that will keep it just under the 7" maximum. Add paint and clear coat but, resist the temptation to finish too fast. Let the car's finish cure for a couple days. Use the time to prepare your axles & wheels.


My method of applying a finish was to first use wood sealer on the raw wood. I filled in any remaining space in the routed out slot on the bottom with wood filler or spackle. After sanding all that smooth next was to spray on some primer; Sand that smooth and apply the first coat of paint.

As a first coat, I always sprayed the bottom of the car first with Semi-Black paint. It dried fast and allowed me more time to concentrate only on the top, thereafter. Spray the chosen color of paint on top in a couple of coats and, after it has dried a couple days wet sand with 400 grit sandpaper. Clear coat the top and once it has time to cure it can be polished with any car wax.

Those extra steps are entirely unnecessary but if you want it to look better then take the time.
 

T-Town Mini

Well-Known Member
#32
Pinewood Derby Tips:

Axles, Wheels and Lubrication

Extra axles & wheels are a good idea when preparing your Pinewood Derby car. They're available from the local Boy Scout Office and can be purchased online via BSA, too. Having extras allows you to chose the best examples out of the lot for your car.


Axles:

One of the worst things that can happen (eliminating your chances of winning a race) is if the axles are inserted into the wheels before they've been deburred. When opening the kit the first thing kids will want to do is to play with the wheels, etc. so, have a file in hand ready to start working on them right out of the box.

The obvious deburring is required at the nail head to remove flashing that would otherwise scrape against the plastic wheel. What may not be so obvious is the raised flashing at the opposite pointed end. If you insert the nail through the wheel when they're "new" you'll likely scratch a grove inside the wheel causing irreparable damage.

So, this should be step number one: Deburr the axles at both ends. Various methods have been described and they all will work to some degree. What worked best for me and my son was to hold the nail with a drill chuck and manually file any burrs at the head without running the drill motor. Once the burr was gone the motor can be run at low speed to level out the nail surface where it meets the head with a fine cut detail file. Sand the surface using various grit sandpaper with the motor running until it has a polished appearance.

The pointed end only needs to be filed so the flashing is level with the nail shaft. There's no need to remove any ridges or ripples at the end since it will be inserted into the wood. Just make sure the nail shaft is round without anything left that would scratch the wheel's plastic surfaces.

Wheels:

The wheels need to be deburred at the inside edge that will rub against the track's guide rail AND also at the wheel hub that meets the car body's painted surface. Lightly sand the inside hub only...do not sand or bevel the outside of the hub where the axle head meets the wheel. The molded plastic surface on the outside of the axle hub is as good as it can be...you'll only rough it up.

To clean the wheel tread, we mounted the wheels on a mandrel that was chucked in a drill motor and used fine sandpaper to lightly sand away the outside surface only. This was done just to make the tread flat...not to reshape it. There's a molding bump that may need work to smooth out but that's the extent to any sanding that was allowed in the Scout class.

The outside tread surface can be buffed to a polished finish. I had a dremel with a small buffer pad we used to do this but, it could be done with the wheels still chucked up and run against a cotton cloth. This is an extra step that may not be essential but we did it anyway.

Lubrication:

Only use dry black graphite lube on the axles and wheels. Anything else will only gum up the works. I used a powered Teflon lube once and both my son and I lost that year. The stuff works great on hard plastic used in gears and hinges but it failed miserably on our PWD gravity powered cars. ONLY dry black graphite...it bears repeating.

The graphite needs to be worked into the inside of the wheels along the axles as well as the outside tread. The more the better. I found that working the graphite inside the hub before installing them on the car was easier and less messy. I used a cotton pipe cleaner coated with graphite and buffed the inside surface of the wheel hub. Once the wheels were mounted on the car I would run the wheels over some newspaper with all the spilled graphite on it to work the lube into the tread surface.

Now, is when the kids can spin the wheels on the axles...it will only work more graphite into the plastic wheels. :laugh:
 
Top