Havasu Dave's - "Mini Bike" - (Just For Fun)

Welded up the replacement axle supports. (Still waiting on an axle)
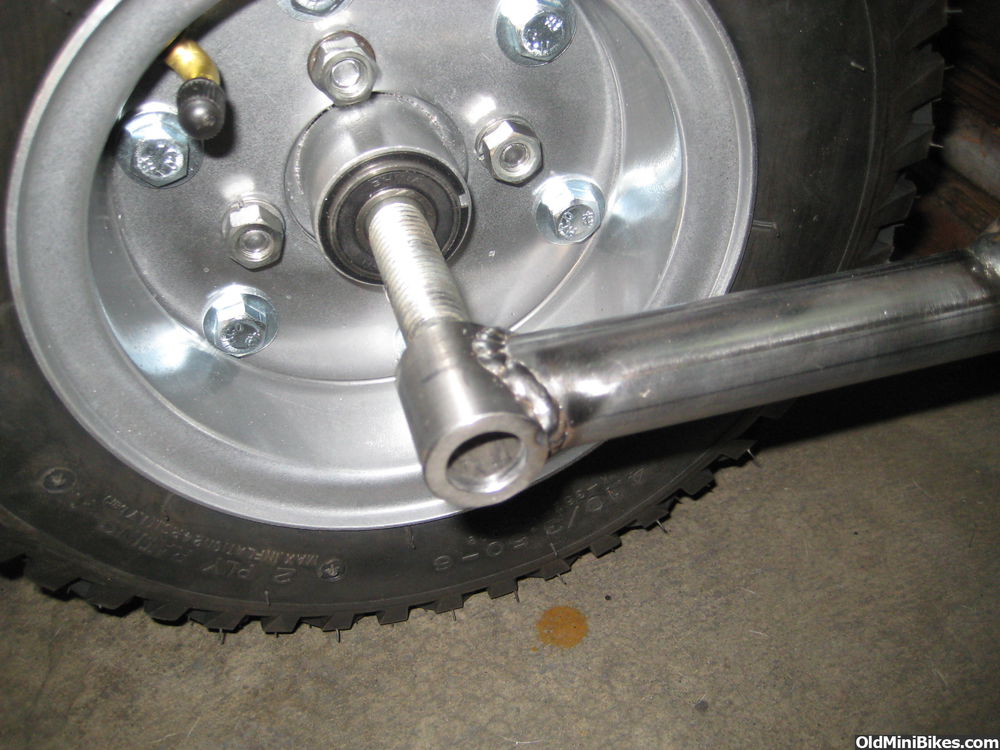
Moving the axle back 3 inches made all the difference in the world for JS and brake fitment. Didn't hurt the stance at all.
Moving the axle back 3 inches made all the difference in the world for JS and brake fitment. Didn't hurt the stance at all.
Hey, pretty ballsy posting extreme close up of my weld eh? :laugh: This was my best effort, and I even read the book that came with my welder before doing this, AND practiced beads on some scrap and got my voltage and feed just right. STILL looks like this. But it's strong, like bull.
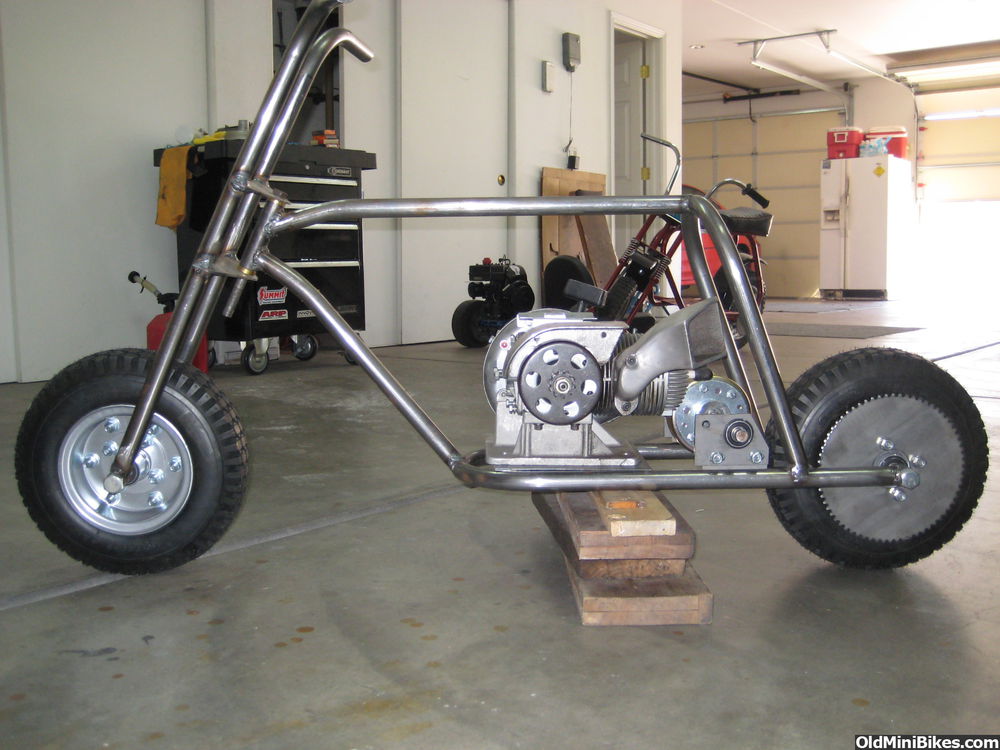
Now that I have the rear axle squared away, I have found that my drive chain will not clear that Palmini exhaust. The exhaust is the most important part of the bike. It's fairly rare, and if you find one, worth two Predators, or 15 30-packs of adult beverages. So, I will need to elevate the engine plate at least an inch.
The other option would be to run the JS lower, but that would mean non-adjustable JS mounts, and as the rear axle is non adjustable, I just don't want to do that either.
Dave I ran in to the same problem and used a piece of 1'' aluminum under my engine and problem solved.
I'm only looking at the photos and you have a better vantage...but isn't it possible to make a wider jackshaft plate and correspondingly spaced tabs on the frame to lower the bearing plate one inch and keep the ability to adjust? That engine looks killer directly on the engine plate. I couldn't find a better picture to illustrate...but this one shows a cut out that could be elongated for travel (the plates are for TAV, the clutch driven plate has the bearing between the two mounting bolts). Hope this helps stir some creative juices.
Attachments
-
 2.8 MB Views: 107
but isn't it possible to make a wider jackshaft plate and correspondingly spaced tabs on the frame to lower the bearing plate one inch and keep the ability to adjust?
To put it in perspective, I'd need to flip the JS mount upside down and weld it to the bottom of the frame for the chain to clear the exhaust. But that puts the brake hub too low. Conversely, I looked at widening and narrowing the JS welded on mount location, and I run in to bolt accessibility problems.
If I were "real" good, I'd weld bungs in the frame and slot the JS plates to move on them. But even that wouldn't give me the room I need. That Gilson set up would still be way too high, as pictured.
I think the photo of the bike does not illustrate how tiny it is. From the bottom of the frame to the top bar is 13 inches. What is also not detailed, is that I don't have any leeway with that brake hub. I am not going to run brake cable between the spark plug wire, and any lateral placement of it, and it hits either the rear tire, or runs right on the engine. Remember, I need room for the brake band, as well as the pivot/linkage and actuation cable and adjuster.
I can't move the engine further forward because I run out of room for the carburetor/filter.
The chain hits the exhaust when it is looped over the JS as it sits with NO sprocket. I plan on using a 10t, which is why I am estimating the 1".
Or as we say, 10 pounds of crap in a five pound bag. LOL, but this is why I enjoy the hobby. I can completely change everything, and still afford it. Thanks for the comments Pete.
Dave if you can raise the engine 1 inch and it will clear then it looks like there is room to lower the JS 1 inch and use a custom bracket with the bolts fore and aft of the shaft. As Pete said we are only looking at pics sooo.... It just seems that a long JS bracket with the bolt holes and the JS hole all on the same plane would drop the bearing an inch or maybe a touch more.
That's the perspective from my bucket..... :thumbsup: :anon.sml:
I am sure you will get it right.
Doug
That's the perspective from my bucket..... :thumbsup: :anon.sml:
I am sure you will get it right.
Doug
Dave if you can raise the engine 1 inch and it will clear then it looks like there is room to lower the JS 1 inch and use a custom bracket with the bolts fore and aft of the shaft.

Last edited:
Bike looks great Dave , knowing your builds this is childs play for you :thumbsup:
Thanks, and it is a fun project, because I am not so spiritually invested in it. Can we say that here? I have other projects going on at the same time, and dealing with some medical issues, involving pain, medications, and invasive procedures, all of which keep messing up my mojo! I can do a lot with adult beverages, etc, but that prescription stuff, now that just causes "brain cloud."
Looking Super Dave, I only have one Question

Does anyone else think this is a problem? I am no metallurgist, steel guy, or in any way qualified to ascertain if this will bend, unless I build it and take it off some sweet jumps. I have never seen a bike with tubing this thick, not even the Powells and Gotes.
Edit: When the frame was bent, the builder had to use heat to make the bends with his bender, if that means anything.
Last edited:
Dave I ran in to the same problem and used a piece of 1'' aluminum under my engine and problem solved.

The frame is sharp as it is. Sounds like it is built with high-quality tubing. I like the lines it has. It is a tough decision on whether to add the supports or not
I can understand you wanting to protect that sweet exhaust. It looks great along with your engine mount and chain/clutch guard. With the clutch running inboard, doesn't give you a lot of clearance . That was one of my concerns with the build I have going. OND's idea would give you a nice clean look and some additional clearance.
The frame is sharp as it is. Sounds like it is built with high-quality tubing. I like the lines it has. It is a tough decision on whether to add the supports or not
The frame is sharp as it is. Sounds like it is built with high-quality tubing. I like the lines it has. It is a tough decision on whether to add the supports or not
I have the jack shaft supports welded in. I added an extension to the right mount, because this is where the brake anchor and cable adjustment will be. With no engine plate, and an adjustable jack shaft- and with it being the only place the chains are adjustable, it is necessary to keep it all one unit for simplistic reasons.
The transverse piece of 1" tubing set in place is a possible solution to my engine clearance challenges. This plan involves using a Go Kart Cycle mount. It is two pieces- one on the PTO side, the other on the pull start side. These are then welded into that transverse piece. I like the clean look it will give. I am just not willing at this point to install spacers on a square plate welded on to a round frame.
Lastly, I am playing with seat design. (It wont be that far back) It isn't quite there yet. For scale, it is 12" long. I can't go much smaller, and still ride the bike. I will fab up a rear piece with some style, and weld it to the frame, extending back under the seat where it will be attached. The front will sport a couple of "ears" to mount the seat to.
Once I get the wood base cut and mounted, hopefully I can get Manchester to do me a custom seat.
Also hand cut all four axle spacers. I'm going to have to use a 5/8 "jack shaft" for the rear axle, because apparently Azusa only goes as long as 10". Just means I'll have a key way in the axle, and I don't think that will hurt anything.
Monday, Tilly rebuild parts arrive from EC Carburetors. Thanks for looking. I am still enjoying the challenges this little bike is tossing at me, and still sitting on buckets (when not using them for seat templates) and thinking about the myriad ways in which I can turn a simple project into a complicated one.