Powell model H restore
- Thread starter The Airman
- Start date
- Tags model powell restore
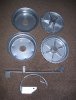

It is welded from the factory and you'll have to take one side lose to change the bearings . The bearings are the same as what in the wheels .
A little grinding and welding is all that needed . And just don't tell anybody, cause we all know when you cut something on these people freak .
A little grinding and welding is all that needed . And just don't tell anybody, cause we all know when you cut something on these people freak .
........:drool::drool::drool::drool:
View attachment 90882 [/QUOTE]
Yea those chrome guys.. ut:...well they don't get in no hurry...thats forsure.:anon.sml:
View attachment 90882 [/QUOTE]
Yea those chrome guys..
ut:...well they don't get in no hurry...thats forsure.:anon.sml: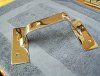

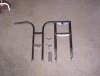
Finally the frame back from the powder coater. Just in time for the holidays. Now I just need the time to work on it !!!

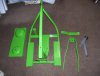
It was the closest color they had to the original Powell green that I could find in his selection of colors. I never realized that the color choices are not as vast with powder coating as they are with spray paint.
It was the closest color they had to the original Powell green that I could find in his selection of colors. I never realized that the color choices are not as vast with powder coating as they are with spray paint.
:drool: Nice!!!! I really wanted to do the green when I was redoing an "MO" model. My PC guy was doing a bunch of panels for some caterpillar earth movers....lets just say the excavating company may have helped pay the bill on mine since it got coated at the same time in the new cat yellow so I just did that instead :wink: Looks VERY cool....I am green with envy! :laugh:
:drool: Nice!!!! I really wanted to do the green when I was redoing an "MO" model. My PC guy was doing a bunch of panels for some caterpillar earth movers....lets just say the excavating company may have helped pay the bill on mine since it got coated at the same time in the new cat yellow so I just did that instead :wink: Looks VERY cool....I am green with envy! :laugh:
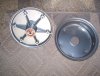
A little of the chrome finally back. And a little more is still there, and those chrome platers are a finicky lot, so who knows when the other parts will be done.
View attachment 90882
View attachment 90882
A little of the chrome finally back. And a little more is still there, and those chrome platers are a finicky lot, so who knows when the other parts will be done.
View attachment 90882
View attachment 90882
I love this bike. I had a question what is the distance between the bottom of the upper fork and the bottom of the axel tabs, either 5 1/2" or 7 1/2" . Some bikes had longer forks and some shorter can't find any rhyme or reason to the ones I,ve come across. Thanks.
Based on serial numbers, I assumed the crimped version was the newer, improved idea. I do not recall this causing a difference in fork length, but you certainly had to cut the ends of the fork tube to get springs off. I welded them back on with slugs. If someone did not reweld them after spring removal, they would have been 2 inches shorter.
Just a guess here. No idea if this applied to other models.