Windber Trail Rider: Gilson "Copperhead"
- Thread starter Dr. Shop Teacher
- Start date
- Tags copperhead gilson rider trail windber

pete, running the same gearing as the other bike or are you going to change it up little with your snow hogs little taller.

Looks great Pete! I was wondering what you were going to do with that frame. My inexperience didn't catch the missing frame tube, sorry about that. If you are going to make chain guard bucks, I would probs be interested in some repops in the future.
Very nice job, sorry to hear you got boned by the powder coater!
Looks good so far Pete. Hopefully you'll get the rest of your parts back soon and get this beauty together! That's a great color for that frame
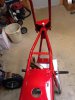
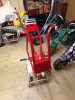
I should have placed the bike away from the fence in the background, the metallic is really awesome.
Minor progress
I set the gear ratio for the bike today--going with 6.54:1 and the Wilderness is going back to 6.33:1 (it pulled very nice with that ratio). With the 15" tires, I should still hit 31-32 mph. Needed to order another sprocket from OldMiniBikes to make the set-up. Aside from that, still waiting for the coater to call, but I got the foot pegs and grips on. Still tinkering with color for the clutch guard.
I set the gear ratio for the bike today--going with 6.54:1 and the Wilderness is going back to 6.33:1 (it pulled very nice with that ratio). With the 15" tires, I should still hit 31-32 mph. Needed to order another sprocket from OldMiniBikes to make the set-up. Aside from that, still waiting for the coater to call, but I got the foot pegs and grips on. Still tinkering with color for the clutch guard.
Attachments
-
 2.3 MB Views: 28
 -
 2.4 MB Views: 32
Fiddling around while I wait.
The sprocket from OldMiniBikes came into today which was the last piece I needed mechanically....now I just need the frame parts.:cursing:
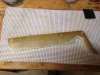
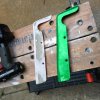
I made the buck for the rear chain guard today, and then formed the rear guard. The picture shows it just out of the mold, so a bit of work to do there.
I played with several different treatments for the clutch guard and settled on what's shown. You can't find the frame color in a can, so I did what we in the graphics world call 'layering.' The base is a copper VHT Engine Paint. On top of it is a Sand Gold metallic, followed by a light coat of copper again, then a mist of silver metal cast ground coat. I lightly wet sanded with 600 and topped with it with a light coat anodized red. I then color sanded with 2500 wet to bring out the copper tone, clear coated, sanded with 2500 again, and cleared again. It's a pretty good match to the frame coat.
The sprocket from OldMiniBikes came into today which was the last piece I needed mechanically....now I just need the frame parts.:cursing:
I made the buck for the rear chain guard today, and then formed the rear guard. The picture shows it just out of the mold, so a bit of work to do there.
I played with several different treatments for the clutch guard and settled on what's shown. You can't find the frame color in a can, so I did what we in the graphics world call 'layering.' The base is a copper VHT Engine Paint. On top of it is a Sand Gold metallic, followed by a light coat of copper again, then a mist of silver metal cast ground coat. I lightly wet sanded with 600 and topped with it with a light coat anodized red. I then color sanded with 2500 wet to bring out the copper tone, clear coated, sanded with 2500 again, and cleared again. It's a pretty good match to the frame coat.
Attachments
-
 2.4 MB Views: 19
 -
 2.2 MB Views: 22
 -
 2 MB Views: 42
Last edited:
Progress.....
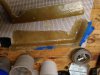
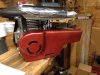
The coater stayed late last night as he was slammed with work and two employees bailed on him. I was supposed to pick up the remaining parts at 5:00, then 7:30, and finally at 11:00 pm, I got the last of the parts. I had a problem with the fuel tank...the solder melted at the bung, so the bung came off in the oven, and Delray had put a baffle in the tank, and it too broke loose. So I was able to remove the baffle with some surgical skill using tin snips...my dad taught me well. :laugh: I was able to silver solder the bung back on, leak tested it and flushed the tank with mineral spirits.
I got the chain guard sized up and bondo-d yesterday, and it looks good and is ready for paint.
A few details about repairs to the bike: high speed forks had to be straightened; frame needed to be plug welded where a foot brake had been welded on; the swing arm needed to have the slot for the brake assembly filled and reformed; a hole in the down tube gusset had to be filled; and, rust divots needed to be filled as best as they could using weld. The bike is by no means show quality...the Wilderness had a much better foundation but I will say it's got a cool look about it.
A couple of photos to start...
Attachments
-
 2.4 MB Views: 21
 -
 1.5 MB Views: 28
 -
 1.9 MB Views: 25
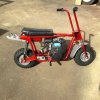
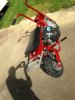
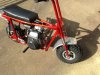
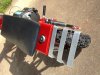
A little more than a roller....
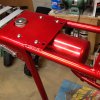
I thrashed all day today to get the bike to roller status. I had to make new wheel spacers for the front and rear using spacers from OldMiniBikes. To secure the tank, I had made the mounting brackets a tad wider than on the Wilderness and notched them to lock the tank side-to-side. Rather than making tabs, I bought screen door window clamps, eased them open with the Dremel and used them as washers.
The fuel petcock and the carb fuel inlet are almost level, so I will have to use a fuel pump. The supply tube will drop below the carb and pump back up. I had considered using an aftermarket air cleaner and adapter, but after mounting the engine, my suspicions were confirmed as there is not enough clearance to fit another filter assembly so we stay stock. The 10" heat shield should work fine. I clamped it to the muffler and spaced it off the pipe using a 1" screw. Plenty of room for my size 12 feet on the pegs with the narrower OHC GC190.
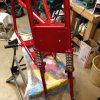
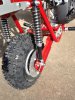
The fenders are Gilson originals. There was one good one with the bike when I bought it, and I had one good one from the Wilderness. I have to make the rear bracket yet, so it's not installed. The Sno-hogs fit just fine but I'm going to need some street time to round the edges, as the front forks vibrate a bit when rolling it around.
I stitched up the seat using the original foam. It's not Manchester1 quality...but she has me on the list for after Windber.
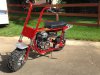
The photos do not do the bike justice. The eye of the camera cannot pick up the copper tone in the coating, so it looks red. I stole the color combo from Chipper....and his grandson....though I used silver rather than black as the contrast. Still more to finish up: rear fender, jackshaft, chain and controls but should be out for a test ride tomorrow.
I thrashed all day today to get the bike to roller status. I had to make new wheel spacers for the front and rear using spacers from OldMiniBikes. To secure the tank, I had made the mounting brackets a tad wider than on the Wilderness and notched them to lock the tank side-to-side. Rather than making tabs, I bought screen door window clamps, eased them open with the Dremel and used them as washers.
The fuel petcock and the carb fuel inlet are almost level, so I will have to use a fuel pump. The supply tube will drop below the carb and pump back up. I had considered using an aftermarket air cleaner and adapter, but after mounting the engine, my suspicions were confirmed as there is not enough clearance to fit another filter assembly so we stay stock. The 10" heat shield should work fine. I clamped it to the muffler and spaced it off the pipe using a 1" screw. Plenty of room for my size 12 feet on the pegs with the narrower OHC GC190.
The fenders are Gilson originals. There was one good one with the bike when I bought it, and I had one good one from the Wilderness. I have to make the rear bracket yet, so it's not installed. The Sno-hogs fit just fine but I'm going to need some street time to round the edges, as the front forks vibrate a bit when rolling it around.
I stitched up the seat using the original foam. It's not Manchester1 quality...but she has me on the list for after Windber.
The photos do not do the bike justice. The eye of the camera cannot pick up the copper tone in the coating, so it looks red. I stole the color combo from Chipper....and his grandson....though I used silver rather than black as the contrast. Still more to finish up: rear fender, jackshaft, chain and controls but should be out for a test ride tomorrow.
Attachments
-
 2.7 MB Views: 53
 -
 4 MB Views: 37
 -
 3.7 MB Views: 39
 -
 3.1 MB Views: 33
 -
 4 MB Views: 37
 -
 3.7 MB Views: 33
 -
 2.6 MB Views: 38
 -
 3.1 MB Views: 37
Last edited:
wow, what kind of heat is going through your parts when getting power coated. i think i will stick with my base coat/clear coat.....:laugh: surprise it didn't also damage the center of the tank too(solder welded).
big tank looks good under the frame. doesn't look over size(big) looks like it's made for it.....:thumbsup:
big tank looks good under the frame. doesn't look over size(big) looks like it's made for it.....:thumbsup:
Last edited: