j57little's - Roper Rebuild - (Vintage Class)

j57little

Active Member
#1
This may be the most difficult project I've ever attempted. The stuffed animal selected is a skunk - the starting condition of this minibike could be no worse - it really stinks! Anyone have any advise on how to remove the chrome lift bar from the frame? It's really, really frozen in there. And speaking of the frame, there will have to be some weld repairs before the restoration can even begin - this thing is rusted completely through in several spots. Let's see, motor, 2-speed clutch, oh, and everything else - should be no problem at all! Roper-Original.jpg
 
#2
I dig the skunk. Good luck and Thanks you for participating again.
On a side note...only thing that worked for me was lots of patience..propane torch...and tons of PB blaster penetrating oil.
 
#3
Jacks back! Thanks for playing again. Looks like you have a great start to a great bike. I'm glad you found the Sears bike, and I'm sure it will look great once completed.
 

Dnice

New Member
#4
Looking forward to this. As a Roper owner and newb to the minibikes, I'm sure I will learn something here. Good luck!
 

j57little

Active Member
#5
The good news is that I think I have an original seat and tank (assuming I can seal up all the rust holes!). I haven't decided about the final color, but except for that I will try to make it pretty close to original - Tecumseh (Craftsman) engine, two speed clutch, etc. I loved my Roper as a kid, but one thing I always hated was the industrial garden tractor white wheels. The wheels will get an upgrade for sure! And with the frame so badly pitted I will probably go with a textured powder coat finish.

I appreciate any and all suggestions and ideas. And for my fellow Roper fans I do have a small bit of knowledge that might help, so ask away if you have a question.
 
Last edited:

j57little

Active Member
#11
Never say die!

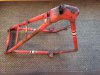
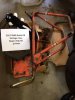
Progress has been slow, but steady. I finally got the lift bar out - actually I had a guy put a blue tip torch to it and once it was red hot - out it came! The good news is that neither the frame nor the lift bar were damaged. I also noted a large pipe separation in one of the main tubes that had to be welded back together. That's finished and media blasting is next. This frame is so rusty I'm sure I'd be better off just ditching it and starting over with another frame, but I'm on it now.

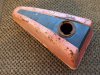
The tank is another issue. It is rusty and has at least one pinhole leak from rust perforation. I'd appreciate any tips on the gas tank. I have a plan, but appreciate all suggestions. Some say weld up the leak. Others just say to use Red-Kote. I do want to repaint it to look nice, so whatever method I choose is important.

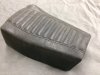
I have the original seat. Some of the higher end Ropers had a thicker molded vinyl seat and this one has stood the test of time.

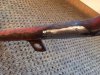
I found a motor - an HS50, slightly newer than original, but should be OK. Of course I picked one with a pulley fused to the shaft and that means cutting off the old shaft and replacing it. That's OK because I need a tapped and threaded shaft end anyway. I will upgrade this one with a lighting coil as well. I can do a lot with engines on my own, but this one will get special help from a true engine master. Send me a PM if you'd like more information.

I have a replacement two-speed clutch that I plan to use and I also have a new set of shocks, stripes and decals. What I am missing is the scrubber brake. Scrubber brake leads are appreciated!

I plan to upgrade the original wheel barrow wheels with something nicer, but will stay close to the original size. The five-spoke type from OldMiniBikes warehouse might be the ones.

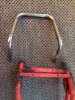
And finally, I have not figured out what to do with the handlebars. They need chrome plating, but the Ropers handlebars are welded to the triple tree. And the ones I have are super rusty. I may be better off finding another set of forks/triple tree.

All thoughts are welcome!

Jack

31JAN2017-1.jpg 31JAN2017-2.jpg 31JAN2017-3.jpg 31JAN2017-4.jpg 31JAN2017-5.jpg 31JAN2017-6.jpg
 
Last edited:

buckeye

Well-Known Member
#13
Chrome the whole friggin front end.:laugh: Solves that.:thumbsup:
Working on these old things always reveals their hidden secrets.
They were used by kids still wiping snot on their sleeves.
 

j57little

Active Member
#14
You are correct! These things were never meant to last - they were made as cheaply as possible and sold to entertain kids. Unfortunately there are those kids like me who recall some of their best memories on a mini bike! And yes, mine was a Roper! I see a lot of chrome in my future...
Thanks,
Jack
 
#15
It was a $400 bill to rechrome the entire forks on mine ( last year build off ) , not too bad actually but still a big expense , do you have all the brake set up ? or just missing the pad ? Caswell's tank sealer is the secret ! Weld the hole , clean inside of tank as much as possible then seal it following the directions closely !
 
Last edited:
#16
I don't think welding the pin hole in the tank is the best/simplest solution. I would be afraid that as soon as you made an ark there would just be a bigger hole... A lot bigger. I think you should soldier it closed and then coat the inside of the tank. This is the way I have done a bunch of tanks for cars that were not replaceable. You can get solder with so low of a melting point that you can solder with a Bic lighter. I didn't think much of it when my cousin installed a new water heater in my house with that stuff and a Bic lighter. That was 20 years ago and it has not leaked yet. And that is on city water with 105 PSI of water pressure. Search around for low temp solder and try that to make a solid structure and then clean it real well and then coat it. You will probably find more pinholes when you strip the tank. If you sand blast it keep it as far away from the gun as you can and still remove material. Post up some pics.

Doug
 
Last edited:

j57little

Active Member
#18
Thanks Chipper for the advice.

Yep, I figured it would be a big bill for the chrome. But I'll get that going pretty soon.

The scrubber brake arm is all there, but bent. I'll heat it up and straighten it out and it should be good. I just need the scrubber. I guess I can order it from OldMiniBikes. I do want to run another brake to the jackshaft clutch (per the original), but I haven't quite sorted that out yet. Thanks for the tip on the tank sealer. The tank is really, really bad. The leak is so small that it's hard to find (less than 1/16" so I am hoping I can seal without welding. There's just not a lot of material there and I don't want to deform it with too much heat.

FOMOGO and Sport King Eric - you mentioned soldering instead of welding - now that could work if I can get the surface clean enough for the solder to stick - lots of rust!

Thanks again!!!!
Jack
 
Last edited:
#19
Thanks Chipper for the advice.

Yep, I figured it would be a big bill for the chrome. But I'll get that going pretty soon.

The scrubber brake arm is all there, but bent. I'll heat it up and straighten it out and it should be good. I just need the scrubber. I guess I can order it from OldMiniBikes. I do want to run another brake to the jackshaft clutch (per the original), but I haven't quite sorted that out yet. Thanks for the tip on the tank sealer. The tank is really, really bad. The leak is so small that it's hard to find (less than 1/16" so I am hoping I can seal without welding. There's just not a lot of material there and I don't want to deform it with too much heat.

FOMOGO and Sport King Eric - you mentioned soldering instead of welding - now that could work if I can get the surface clean enough for the solder to stick - lots of rust!

Thanks again!!!!
Jack
Cool and those guys are correct solder would be way to go ! Possibly JB weld as well ? But a small pin hole should seal up with The Caswells ! I don't have a spare brake pad , I've bought them in the past from OldMiniBikes , pricey but not much of a choice , lol . I do have all the arm and mounting apparatus as I removed it carefully from my Roper when I stretched the swingarm . Good Luck !!
 

j57little

Active Member
#20
The solder came out pretty good, filling the major voids, but I still had some small leaks and brought in the JB Weld (putty variety). The surface appears well sealed now and I will start the tank coating in a couple of days. It's a lot of work for a Roper tank that at best, was not a good looking tank - it always looked backwards to me because the widest portion is next to the seat. I sent the engine to a guy who has helped me with the deep dive engine issues in the past, but I have not gotten in back yet. There's a lot of work ahead! The good news is the inventory list. I have the two-speed clutch, new shocks, new wheels, new fenders, tires, the original seat, lift bar and an almost functional tank! And I have the frame graphics/decals.

One area that I will have to compromise on is the clutch cover. I suppose I'll have to call upon OldMiniBikes for that and the scrubber.
 
Top