Low and Wide Big Tire from Scratch

Update #5
I'm worse than a kid waiting for christmas waiting for the hole saw to arrive so I can finish the hubs. I'm kinda stalled out till that arrives. Anyhow, here is some of what I have done in the last few days.
I put the seat on. I think it looks good. I ordered some 3" springs for the back of the seat. They should be in by the weekend.

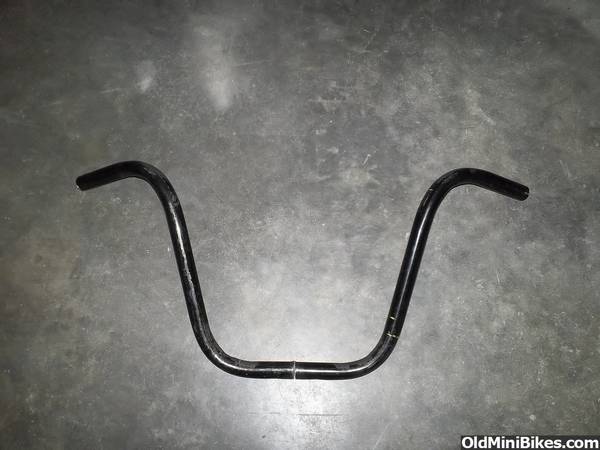
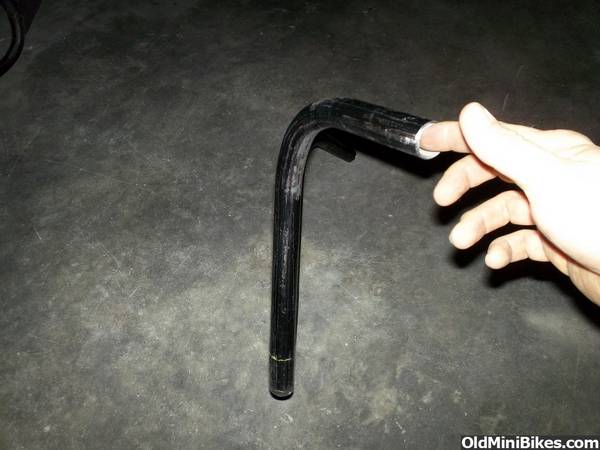
I did not think I would be able to make handlebars that would be worth using, but I decided to try. I figured out what rise I wanted (about 8") and looked at a lot of photos. I used my protractor on the photos to try to figure out the angles since I wanted to use as few joints as possible if I made them.
The top bend where the grips go is actually a compound bend since it also bends the bars back in toward the rider a few degrees. Well I thought they turned out pretty good. I thought about making them a little more narrow for trail riding, but I dunno, I think they kinda look good wide. The risers I ordered will raise them about another inch.


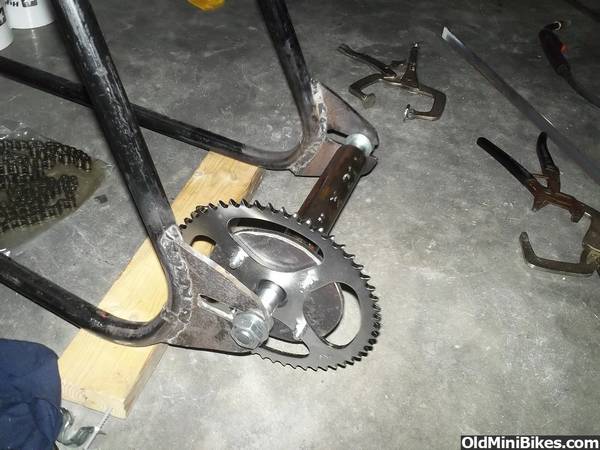
Some parts arrived today and I have everything for the jackshaft except the 19T sprocket I had to get from another place. My final gear ratio should be 10.26:1 I would prefer a lower ratio, but I think I'll end up using a honda 6.5 hp clone with no torque converter, so I will need all the low end I can get. Maybe someday I will be able to afford a bigger engine or a torque converter.
In this photo, the jackshaft is just set in place.

This is a mockup for the front axle. I'm waiting for the bolts to arrive so I can make the actual axles. and the hole saw to cut the disk centers.


Here is the stuff I received today - some chain, jackshaft items, sprocket, jam nuts. I completely forgot to order the 3/4"-16 locknuts for the axle. I had them on my list and just completely forgot them. I was pissed. Now I'll have to pay $6 or $7 to ship 4 nuts. Stuff happens.

I was expecting the sprocket to be a solid plate, not with the cutouts. I was leaning toward using a disk brake on the sprocket, but I guess thats not an option now.
Off to pray to the Postmaster General now.:wink:
I'm worse than a kid waiting for christmas waiting for the hole saw to arrive so I can finish the hubs. I'm kinda stalled out till that arrives. Anyhow, here is some of what I have done in the last few days.
I put the seat on. I think it looks good. I ordered some 3" springs for the back of the seat. They should be in by the weekend.
I did not think I would be able to make handlebars that would be worth using, but I decided to try. I figured out what rise I wanted (about 8") and looked at a lot of photos. I used my protractor on the photos to try to figure out the angles since I wanted to use as few joints as possible if I made them.
The top bend where the grips go is actually a compound bend since it also bends the bars back in toward the rider a few degrees. Well I thought they turned out pretty good. I thought about making them a little more narrow for trail riding, but I dunno, I think they kinda look good wide. The risers I ordered will raise them about another inch.
Some parts arrived today and I have everything for the jackshaft except the 19T sprocket I had to get from another place. My final gear ratio should be 10.26:1 I would prefer a lower ratio, but I think I'll end up using a honda 6.5 hp clone with no torque converter, so I will need all the low end I can get. Maybe someday I will be able to afford a bigger engine or a torque converter.
In this photo, the jackshaft is just set in place.
This is a mockup for the front axle. I'm waiting for the bolts to arrive so I can make the actual axles. and the hole saw to cut the disk centers.
Here is the stuff I received today - some chain, jackshaft items, sprocket, jam nuts. I completely forgot to order the 3/4"-16 locknuts for the axle. I had them on my list and just completely forgot them. I was pissed. Now I'll have to pay $6 or $7 to ship 4 nuts. Stuff happens.
I was expecting the sprocket to be a solid plate, not with the cutouts. I was leaning toward using a disk brake on the sprocket, but I guess thats not an option now.
Off to pray to the Postmaster General now.:wink:
Try Lowes or Home depot for the 3/4" nuts, last time I was in Lowes they carried them but were out.
I picked up some 1" high density foam today and some simulated alligator skin fabric. I used spray adhesive and glued the layer of foam to the seat pan. This first layer is the same size as the pan. The 2nd layer I made about 1 " larger in each dimension so that it would curve around the sides of the pan.
Is the killing and skinning of simulated alligators legal? :laugh:
It's looking good.
Update #6
Well my hole saw is somewhere with the Unites States Postal Service, but where - nobody knows.
I did receive my order for bolts, so at least I could get to work on the axles.
I started by cutting off the heads of two 8" bolts. I cut them so I ended up with two 7 1/2" halves of axle.

I ground the ends of the axles (where they come together) so they have a V in them. This way I could weld the inner part of the axle first, and build up a weld working around the axle and eventually get a solid weld. Then I held them down in some angle bracket to keep them straight, and welded them together.

Then I ground down the excess weld. Here is one finished axle.

Here is where the problem is. When I run the jam nut in on one side, I can no longer get the other side in the hole.


What I have decided to do is just go without the jam nuts on the front, but add a spacer in between the bearings. The jam nuts were meant to be able to tighten the axle to the forks tightly, but not put a lot of horizontal pressure on the bearings. The spacer should do the same thing, although I probably wont tighten the axle nuts as much as I had planned.

Same problem on the back. Cant get the axle in once I have the hub, bearings, spacers and jam nuts on. I am going to extend the slots out the back of the axle plates so that they are open to the back instead of closed. I wanted to keep them closed for added strength, but I believe they will be strong enough even open in the back since they are 1/4" steel.


I received the handlebar mounts that I ordered today, and they look NICE.
Thats all for now. Wish my 1 11/16 hole saw would arrive. If its not here by the weekend, I may need to go to plan B.
Thanks to Jeep2003 for the help figuring out the axles.
Update #7
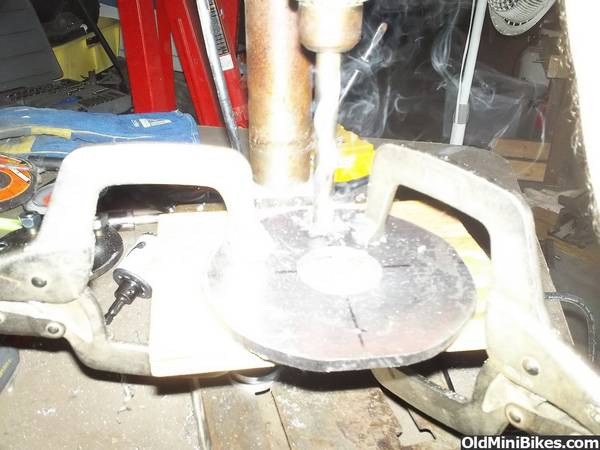
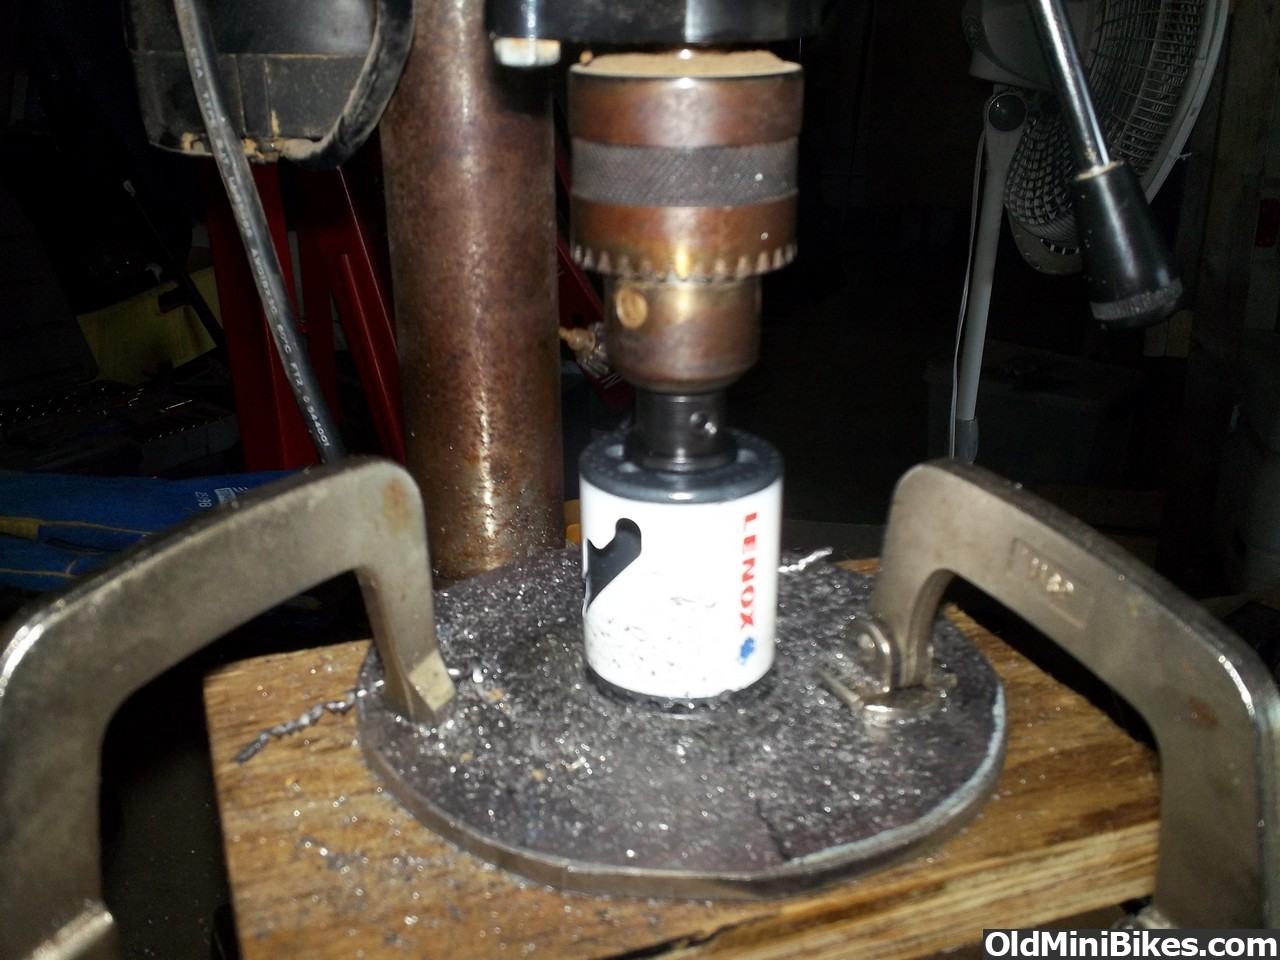
Well its been about 12 days an still no 1 11/16 hole saw. I decided to take drastic measures and I bought a 1 3/4 hole saw. I figured I could handle the 1/16 gap that the larger saw will leave. It actually may give me a stronger weld. :shrug:
Ive been pretty worried about if the hole saw will cut through 1/4" plate. After using the 3/4" saw I was less worried, but it worked GREAT. I've been using Lenox saws and I use the slowest drill press speed and some cutting fluid. It cuts great and after making 3 donuts it is not noticeably duller.

Then I drilled for the wheel studs and for the sprocket mounting bolts on that plate.
Here is the front hub tacked together. I mounted the tire and put on the frame and it was pretty straight.

Here is the finished front hub with the center welded and the studs welded in.


On the back I started by tacking in the hub plate for the sprocket at the very outter edge of the hub center. Then I put it all together on the bike and placed the tire in location to determine the clearances. Things are pretty close and I had to add a few spacers in the back to get it where I needed it.


Tacked on the wheel hub plate to the hub center and reassembled everything again. After I got the spacing all set I realized my axle was going to be to short. I will need to splice in a piece in the rear axle so they extend out far enough to get a good bite with the locknuts.


Northern tool had some of these huge hydraulic fluid filters on clearance for $5 each, so I picked two up to possibly make a fuel tank out of them.


I forgot to take some photos but Sunday morning I got the handlebars mounted and got to do a rolling ride. I had my son pull me with hid ATV around the yard. It rides really nice. The tires really give it a soft ride.
Well its been about 12 days an still no 1 11/16 hole saw. I decided to take drastic measures and I bought a 1 3/4 hole saw. I figured I could handle the 1/16 gap that the larger saw will leave. It actually may give me a stronger weld. :shrug:
Ive been pretty worried about if the hole saw will cut through 1/4" plate. After using the 3/4" saw I was less worried, but it worked GREAT. I've been using Lenox saws and I use the slowest drill press speed and some cutting fluid. It cuts great and after making 3 donuts it is not noticeably duller.
Then I drilled for the wheel studs and for the sprocket mounting bolts on that plate.

Here is the front hub tacked together. I mounted the tire and put on the frame and it was pretty straight.

Here is the finished front hub with the center welded and the studs welded in.


On the back I started by tacking in the hub plate for the sprocket at the very outter edge of the hub center. Then I put it all together on the bike and placed the tire in location to determine the clearances. Things are pretty close and I had to add a few spacers in the back to get it where I needed it.


Tacked on the wheel hub plate to the hub center and reassembled everything again. After I got the spacing all set I realized my axle was going to be to short. I will need to splice in a piece in the rear axle so they extend out far enough to get a good bite with the locknuts.


Northern tool had some of these huge hydraulic fluid filters on clearance for $5 each, so I picked two up to possibly make a fuel tank out of them.


I forgot to take some photos but Sunday morning I got the handlebars mounted and got to do a rolling ride. I had my son pull me with hid ATV around the yard. It rides really nice. The tires really give it a soft ride.
Update #7 Continued
Late Saturday night I was cruising through Craigslist and came across a listing for a pressure washer with a 9HP Honda engine on it for $125. It said that the pump needed seals. I called Sunday morning and it was still available (which is not usually my luck). So I drove up to where it was and checked it out. The seller started it up and it started on the 1st pull. No smoke, looks like its never been apart, and looks like it has very few hours on it. Its a Honda GX270. I did not even try offering the seller less than his asking price. It was such a great deal. Just need to get the recoil starter to retract all the way.


I got it home and struggled to get off the pump. It was rusted on the engine output shaft. I ended up heating the sleeve of the pump that goes over the engine output shaft and finally got them apart.
I just set it the frame and it fits like a glove. It will sit 3/4" lower since its on the wood now. The bike has a low center of gravity and it can almost stand up without a kick stand.


This week I need to add the engine mounting steel and go back and finish welding the frame. I also need to cut out a little bit on the bottom tree of the front forks so I can turn sharper.
I still need to get the throttle and brake components, and the clutch.
Sorry no pics, I still have it in the box it came in....
I bought one with the intent on using it on my Super Bronc trike. It has a single band at the diff, not enough stopping power for its size. Had a rotor cut for the diff. But, I am going to put my trike back to the Super Bronc it started out as. I have a line on a different trike... A Bunker Rake!!
I have a Manco Big cat that I have tried a couple of times to convert it from foot brake to hand brake, without much luck. The caliper on that diameter of a disc does not get enough clamping force, for my likes, from a hand brake.
I think if it were clamping at the jackshaft you are only stopping the small rotor instead of the large tire, mechanical advantage. A super Bronc brakes at the jackshaft and will lock up the rear tire! Not good on chains but... A #40 chain is pretty stout!
I was thinking of putting the brake on my Big Cat but, the way the caliper will need to be bled it will have to clamp on the sprocket instead of the actual rotor.
Search for Hydraulic scooter brake or GY6 brake or Hyraulic ATV. The rears will usually have a hardline that can be replaced to get the length you need.
Hey Big Jim, I'm curious about the hand brake conversion to the Big Cat. I was in the process of attempting that as well. Did you weld a bracket on the caliper mount to attach the cable to, or go about it some other way? I don't see a good way to mount a hydraulic caliper on it anywhere, other than maybe the jackshaft, the clearances are so tight on these bikes. I didn't want to go the jackshaft route, since it puts so much stress on the chain, and no chain, no brakes.
Thanks for the comments everyone. I love getting feedback on it.
Floorboards - Yes or No? I'm thinking about using floorboards instead of footpegs. I think they would be nice on longer rides, and it would be nice for two-up riding. Only downside I can think of would be the added weight.
bigrob - I am using 1 3/8" OD x 3/4" ID precision ground ball bearings with a snap ring built in. The pipe I am using is just slightly larger - by like 1/32" or so. When I first put the wheel and hub together on the axle I was getting a rattling sound when I spun the tire because of the gap. What I did was weld a small bead on the inside of the pipe for about 1/4 of the circumference, and then filed it down for a perfect fit. Not the bearings gently tap in and out. It actually worked better than I expected.
I was having a hard time finding them because of the 3/4" ID (everyone carries 5/8") and initially ordered some off of ebay, but they turned out to be unground, and while they were not as bad as the ones with the stamped housing, they did not have very tight tolerances. Side to side movement of the inner race was significant. I ended up finding another source that sells a pack of 10 for $28 with free shipping. They are ground and are much nicer. PM me if you need the source.
LowandWide, your build is looking great!
Hey Big Jim, I'm curious about the hand brake conversion to the Big Cat. I was in the process of attempting that as well. Did you weld a bracket on the caliper mount to attach the cable to, or go about it some other way? I don't see a good way to mount a hydraulic caliper on it anywhere, other than maybe the jackshaft, the clearances are so tight on these bikes. I didn't want to go the jackshaft route, since it puts so much stress on the chain, and no chain, no brakes.
Hey Big Jim, I'm curious about the hand brake conversion to the Big Cat. I was in the process of attempting that as well. Did you weld a bracket on the caliper mount to attach the cable to, or go about it some other way? I don't see a good way to mount a hydraulic caliper on it anywhere, other than maybe the jackshaft, the clearances are so tight on these bikes. I didn't want to go the jackshaft route, since it puts so much stress on the chain, and no chain, no brakes.
I think if you got a caliper that has options for bleed you can scarf the original caliper mount off and weld a new one on and re-use the original disc.