Manco Thunderbird Budget Build

#21
Cool project....my son has started his thunderbird rebuild as well, he will be opening a build thread in a week or so....
those GC series hondas have good power, perfect for a minibike. They have a single lobe plastic camshaft. the exhaust bolts always break, so frustrating...
Trust me, the new bolts will go in with anti-seize. I plan on mocking up the header tomorrow then off for welding.
 
#22
Primed the frame today and started spraying color on parts. Am going to use VHT wheel clear coat to seal the paint. Have learned already to spray VHT sparingly, as too much interacts with the base coat and I have to start all over on the part. Goal is to have parts staged so reassembly is quick.
 
#23
The header is fabricated!

Thanks to stargazer's post (and part numbers), I was able to fab the header today. Sticking with the budget theme, I picked up a Briggs 3/4" muffler from Tractor Supply for $5, and some 1/2" flat stock at Home Depot for the supports. I had already primed the frame, so I taped it to protect it when I was trial fitting the plumbing. If you do this, make sure you mount the engine as far forward as you can to allow for clearance and chain adjustments. I set the header so that it cleared the front tube by 1/2". I'm going with just a straight pipe back, with a short tip after the muffler. This will keep it in line, and under the seat. The tip will direct exhaust down. I'm still thinking about what the heat shield will be made of, have a couple of ideas floating around in my head. Next up is finding a good welder who will take a quick/simple job on.
 

Attachments

WrenchDad

Active Member
#24
I have a bird Thunder bird with the plastic tank and I painted it with Gloss black high temp engine paint It is gas resistant and shines like new
 
#25
Wow!

Wish I'd been able to save my wheels. They were rusted out at the valve and beyond repair. After sanding some more, I'm going to paint it white.
Here's a close up of my Bird almost done...I like the tear drop tank on it...
 

Attachments

#26
I throw away all my receits from my builds , and try to bulk buy on supplies for a couple of bikea at a time
But you are way under budget for your bike I am guessing but bet most of my bikes end up costing me $300 to $500 for materials by the time I am done lol
I throw all my receipts out also.:laugh:
The plastic/vinyl paint works pretty good on plastic tanks. Not sure about being gas resist.:eek:ut: I doubt it.
 
#28
You could always shoot it with 2k clear coat afterwards. Eastwood makes one that's about $25 a can. Works great too
That's an idea, though I'd have to invest in a gun. My compressor, though, is a 6 gal Ryobi that I use for nailing. I don't know if it will keep up a constant flow. Before I spray anything more, I've got to rig up some sort of protective area--the oaks are pollenating here and everything is yellow green with pollen!
 
#31
Manco Budget Breaker/Exhaust Shield

Went to the welding shop that my mechanic recommended today. Ouch, I gave up a gold tooth--but thank goodness I have my own checkbook. Nothing like being just south of DC. Everything is expensive...but the guy I found really is interested in what I'm doing to the Manco so he'll let me help on the welding. Below is what I came up with for the heat shield.

The exhaust shield will run the side of the engine to the card. The muffler and tip will be behind it. Got a short exhaust pipe from Advance Auto for $7, eyeballed it and cut it with the sawzall. My drill press is a little small, so I just punched the metal and drilled it with my 1/2 drill, after 1/8" pilot holes.
 

Attachments

#32
One step forward to hurry up and wait....

Everything is blooming here and the pollen is so thick, your eyes feel like sand paper. Have to wait a few days before I can start spraying the frame, but I have a few parts in color and have started to seal coat. Got the brackets made for the header/muffler and get it welded tomorrow. I cleaned up the exhaust shield and ran a grinding stone over it and followed up with a 60 grit disk. Not sure I like the way it looks, so I may sand on it some more. Because there are few points on the Honda block to mount supports, I had to make a strap for the muffler. I used 1/16" aluminum flat stock and made a bending jig out of the muffler and a 5/8 axle. I was able to use my Work Mate to serve as the base for the bending jig. After the strap was close to shape, I used a big wooden clamp (you wood workers know this is a "hand screw") to force the strap into a tighter circumference.
 

Attachments

#35
Cool build, I've got a Thunderbird but it's far from being nice. It's a really good bike for slapping a clone on and just riding around for fun. :thumbsup:
 
#36
Cool build, I've got a Thunderbird but it's far from being nice. It's a really good bike for slapping a clone on and just riding around for fun. :thumbsup:
Thanks, I had a Greyhound that I could have slapped on the bike and gone on. The Honda is a good challenge to make it fit and work. I was just going to get the Thunderbird running and sell it, but it had too many issues for me to ignore--starting with a nicely bent right fork. Amazingly, heat from the torch relieved the stress in the metal and it popped right back into position.
 
#38
If you go to Winber that should be a great rider since the ground is pretty rough. Looks pretty nice so far :thumbsup:
That's the plan! Will be my first time, and I'm bringing my buddy so we can ride both my Nighthawk and the Manco. We'll be camping in my low budget travel trailer that we just finished bringing back to life.
 
#39
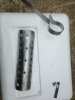
What the fork(s)? Making Progress

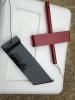
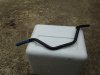
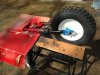
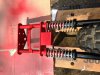
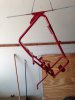
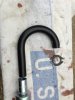
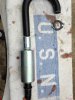
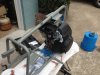
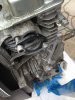
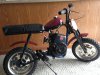
Finished prepping exhaust for welding today. Hopefully the shop will cut me a break with all the prep work I did. All he's got to do is weld. Put the front fork assembly back together, and couldn't resist putting the wheel on (when I got the bike, the right fork was bent and I had to heat it up to straighten it). Everything thing looks true. Shot the gas tank with a coat of primer to see how bad it is: i've got more sanding to do! We had a lot of rain last night, so before the pollen got thick again, I pulled the frame out and shot the hard to get (and see) areas.

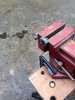
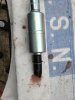
Lastly, I had to cut some bolts down to work with the helicoils. For you young builders, it's always smart to put a nut on the bolt before you cut it, that way when you take the nut off, the threads get cleaned up. I used a die, so that my hack saw had a square surface against which to cut. Either will work. Then file the end of the bolt and touch up the threads (gently).
 

Attachments

#40
Frame in Paint!

Got the first full coat of paint on the frame today. We had another inch of rain last night and the pollen really settled down. Took some of my commercial drop cloths and rigged up a "spray booth" under the deck. I will shoot another coat tomorrow. Gave up on the welder as he had too much big work to do. Went by our local BMW motorcycle shop to see who they would recommend. Turns out they have a machinist who does work at home, so I left him the engine and the parts I'd prepared. Karl was kind enough to point out what wasn't going to work, and what he was going to do to make it right!
 

Attachments

Top