Jackeo21's - Vintage Class - Tru Test - OldMiniBikes Build Off 2016

Well,
Not a lot has changed recently. I have just been very busy with other projects and I haven't had time to work on this bike! Rest assured, I will be starting to get back into it. I have been having trouble getting the rear sprocket to run true, as it has a terrible wobble to it. I was thinking of swapping the sprocket to the other half of the rim to see if it would run better.
I need to get some better starter rope and more patience after the pull start rope snapped on me twice! The problem is that new recoil springs are a little more difficult to install than the old ones, so I have to take the lot out and start again :hammer:
Still deciding on a paint colour! I need to get the frame blasted so I can really begin to do the filling/sanding/painting process.
Pic's to come later, and I will possibly upload a video of my sprocket problems :thumbs:
-jackeo21
Glad to see you back at it. Post a pic if you can of what the rear wheel/sprocket combo looks like assembled. i've got the same problem with an aluminum rim and I'm going to try to fix the run out by truing the sprocket flanges (there are five bolt flanges around the rim). Maybe you can do the same.
Here's what i'm up against.
The sprocket and rim bolt up with these long studs with threads on both ends. One end goes through the rim, and bolts the rim down so you have 4 vertical studs. Then, the sprocket sits on top of them, and the sprocket bolts on. I am going to swap the sides of the rim over and move around a few studs to see if I can get it just right.
Will fix the pull-start when I get the patience. Maybe even upload a "first start" video...?
Still real interested in a dark metallic green.
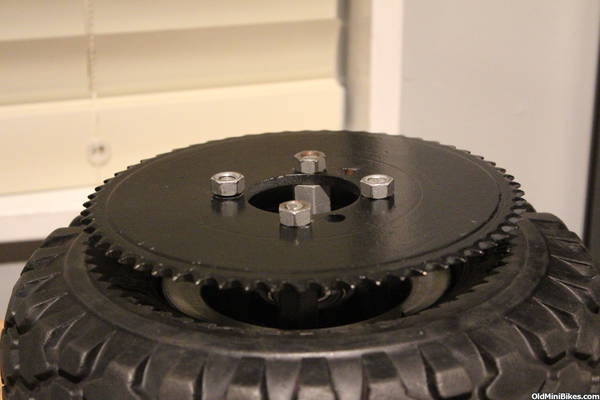
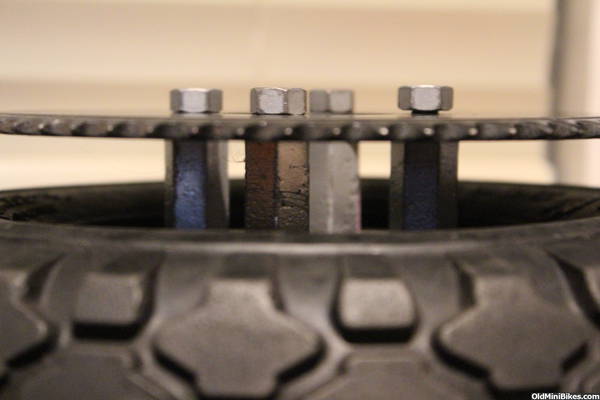
Oh, yes. Had that problem on my ARCO. What you may want to try is clamping the axle in a vise, slide the wheel on and spin it while holding a piece of chalk or a crayon to locate the high side (the run-out). You can then adjust the lengths of the spacers to reduce the run-out on the sprocket. Another way is step the opposite spacer out with a shim washer(s), if you've got room between sprocket and frame. Looking at your photo, the sprocket seems warped toward the outside. If you can flip it, that may help a tad.
You can also beat it with a Big Hammer. I have a calibrated wrist, so it's not that big of a deal. If you cant get it perfect, you can (and should anyway) mount the driver clutch without the allen set screws, and use a bolt and thrust washer on the PTO. This allows enough play on the clutch and chain to compensate for sprocket wobble. Or Wocket Sprobble.
Bit of an overdue update!
After taking the rim apart and reassembling it a different way, I found that the studs were originally on an angle, allowing for large amounts of sprocket wobble. I fixed this by putting the studs through the sprocket first, then aligning the rim with the studs. This worked well and now the sprocket is very true! I'm very happy this problem is out of the way :thumbsup:
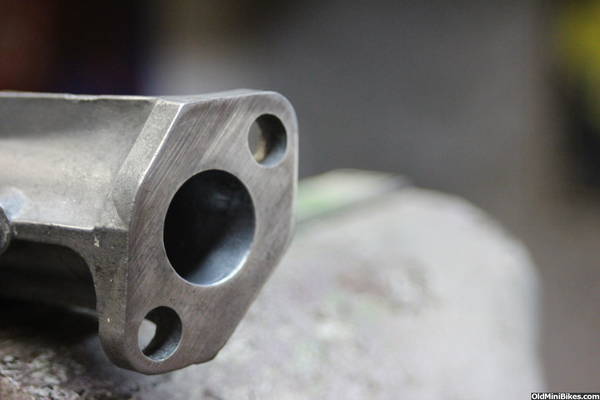
Also managed to fit my clutch bracket. It's made of angle iron from the old seat bracket.
Next up I have to tackle the clutch. Then drill out the engine slots to bring the engine forwards so the fuel tank doesn't touch the tire. Then sandblast the frame. Frame Prep and paint. Then assembly!
I will be away for 9 days next week so hope to make some progress this week!
-Jack

Also Picked up a sweet 1960's small engine service manual! This is an American book, too.

After taking the rim apart and reassembling it a different way, I found that the studs were originally on an angle, allowing for large amounts of sprocket wobble. I fixed this by putting the studs through the sprocket first, then aligning the rim with the studs. This worked well and now the sprocket is very true! I'm very happy this problem is out of the way :thumbsup:
Also managed to fit my clutch bracket. It's made of angle iron from the old seat bracket.
Next up I have to tackle the clutch. Then drill out the engine slots to bring the engine forwards so the fuel tank doesn't touch the tire. Then sandblast the frame. Frame Prep and paint. Then assembly!
I will be away for 9 days next week so hope to make some progress this week!
-Jack
Also Picked up a sweet 1960's small engine service manual! This is an American book, too.
I have decided to look for the half size fuel tank and carb. Although I will loose fuel capacity, I will have so much less to worry about! The current big 3HP tank doesn't clear the tyre, and will only clear if I drill out the frame. If I get a short tank, I won't have to worry, and my fender should clear much better.
I got the rear wheel hooked up in the bike for a test fit and i'm pleased to report that it's, well, perfect!
Hope to get the front rim painted up tomorrow. I need to get that recoil assembled, too.
Bit frustrated on the severe lack of spark this engine is producing :hammer: I hope it's just an earth problem.
Might get a few other things sorted out tomorrow if time allows :laugh:
-Jack
Well,
Luckily I have a 1969 2HP laying around! This motor needs a full rebuild that my wallet doesn't feel like getting into anytime soon - so I'll be using the vaccu-jet carb & tank from it. I didn't want to use this carb for a number of reasons, the main being that the throttle cable connection on the throttle had snapped. After fixing this (pics soon) I began to worry about the next problem - lack of fuel?
I love the super simplicity of these carbs in comparison to the pulsa-jet and flo-jet (don't even get me started on flo-jets :hammer") . They require one gasket and no diaphragm which is my favorite part. It makes me wonder if it will supply enough fuel to my, hopefully well running, 3HP. I guess since they don't require a diaphragm, they rely on the engines compression & vaccum to suck up fuel (hence the "vaccu"). Anyway, I guess I'll find out when I test the engine, hopefully soon! I have seen some minibikes that run vaccu-jets and they seem to run well.
. They require one gasket and no diaphragm which is my favorite part. It makes me wonder if it will supply enough fuel to my, hopefully well running, 3HP. I guess since they don't require a diaphragm, they rely on the engines compression & vaccum to suck up fuel (hence the "vaccu"). Anyway, I guess I'll find out when I test the engine, hopefully soon! I have seen some minibikes that run vaccu-jets and they seem to run well.
There's one thing standing in the way of the first start, and that's the recoil starter :doah: I tried yesterday, and today, and almost got it!......But I either forgot something or didn't wind it tight enough....time to start again tomorrow! 3rd times a charm....:laugh:
I also need to fix the small oil leak with the sump gasket, and the spark. I'm pretty sure the spark issue is just an earthing problem, I'll check it out tomorrow.
Tomorrow I need to sandblast the vaccu-jet and paint the tank.
Thanks
-Jack
Luckily I have a 1969 2HP laying around! This motor needs a full rebuild that my wallet doesn't feel like getting into anytime soon - so I'll be using the vaccu-jet carb & tank from it. I didn't want to use this carb for a number of reasons, the main being that the throttle cable connection on the throttle had snapped. After fixing this (pics soon) I began to worry about the next problem - lack of fuel?
I love the super simplicity of these carbs in comparison to the pulsa-jet and flo-jet (don't even get me started on flo-jets :hammer
. They require one gasket and no diaphragm which is my favorite part. It makes me wonder if it will supply enough fuel to my, hopefully well running, 3HP. I guess since they don't require a diaphragm, they rely on the engines compression & vaccum to suck up fuel (hence the "vaccu"). Anyway, I guess I'll find out when I test the engine, hopefully soon! I have seen some minibikes that run vaccu-jets and they seem to run well.There's one thing standing in the way of the first start, and that's the recoil starter :doah: I tried yesterday, and today, and almost got it!......But I either forgot something or didn't wind it tight enough....time to start again tomorrow! 3rd times a charm....:laugh:
I also need to fix the small oil leak with the sump gasket, and the spark. I'm pretty sure the spark issue is just an earthing problem, I'll check it out tomorrow.
Tomorrow I need to sandblast the vaccu-jet and paint the tank.
Thanks
-Jack
Last edited:
Glad you have the sprocket problem fixed! :thumbsup:Smaller fuel tank means shorter pickups and those can be a bear to remove and replace. Would be good if you found a carb/tank combo in good shape.
. The pickup tube and screen on the vaccu-jet is in very good condition, and the screen is clean. Some carbs, like the pulsa-jet on my mid 60's 5hp is missing a pickup screen as it has rotted off. I read somewhere on the forum that you could get replacements but never really looked into it.The sprocket issue is a huge weight off my shoulders :thumbsup:
I managed to swap the large tank and pulsa-jet for a short tank and pulsa-jet with a friend.
I wasted no time getting into it...
I have finished rebuilding the carb. Some of the things I did to it include:
Scrubbing/sanding/cleaning it by hand, as the sandblaster no longer functions properly :hammer:
Removing the choke barrel.
Sanding the choke barrel with 1200 wet & dry sandpaper, resulting in a shiny but unnecessary finish.
Replacing the rivet so that the choke was more firm.
Removing that spiral thing that "better mixes fuel and air". I read on the forum that most take it out anyway.
Polishing the crankcase vent tube (useless but satisfying :laugh.
Looking at the finished product :thumbsup:
The tank I got with this carb is probably the cleanest tank I have ever seen! Not a spot of rust anywhere! Even the little fuel bowl looks new. Hope to get it painted and assembled tomorrow.
I found a nearby sandblasting outfit that can hopefully do my frame at a good price.
I need to get stuff done tomorrow because i'll be away for 9 days. That means that I will be very restricted on time.

I wasted no time getting into it...
I have finished rebuilding the carb. Some of the things I did to it include:
Scrubbing/sanding/cleaning it by hand, as the sandblaster no longer functions properly :hammer:
Removing the choke barrel.
Sanding the choke barrel with 1200 wet & dry sandpaper, resulting in a shiny but unnecessary finish.
Replacing the rivet so that the choke was more firm.
Removing that spiral thing that "better mixes fuel and air". I read on the forum that most take it out anyway.
Polishing the crankcase vent tube (useless but satisfying :laugh
.Looking at the finished product :thumbsup:
The tank I got with this carb is probably the cleanest tank I have ever seen! Not a spot of rust anywhere! Even the little fuel bowl looks new. Hope to get it painted and assembled tomorrow.
I found a nearby sandblasting outfit that can hopefully do my frame at a good price.
I need to get stuff done tomorrow because i'll be away for 9 days. That means that I will be very restricted on time.
Update:
The time I have left to finish the bike has really crept up on me! :facepalm:
Today I hope to fit the brakes. I also hope to get the motor painted up. Broke the recoil starter for the 5th time last night!!! The compression is too high for it to start, so I need to find a different way to start it. (it even snapped the drill-socket adapter thing when we tried to drill start it!) Hopefully when it starts I can run it for a good half hour or more to break it in and hopefully bring the compression down.
Today when the power is back on (new kitchen - power off!), we can weld the cracked weld that holds the footrest to the frame, and reweld the brake bracket.
The original chain is soaking in diesel and a whole bunch of other stuff. Looks much cleaner now! Really don't want the hassle of constantly adjusting a new stretching chain.
Decided to powder-coat the bike due to time and paint concerns. Most likely to be using a non metallic, gloss color. Would like either lime green or a bright orange.
Pics will come later
-Jack